Custom Data Rules
Use Custom Data Rules to ensure Seamless data matches your CRM. Create data mappings to overwrite field values, apply rules across your team, upload mappings in bulk, and preferred format styles.
Brand refresh in progress
We recently launched a new brand, so some images and videos may differ from what you see in-product. All workflows and guidance remain accurate while we update visuals.
Custom Data Rules in Seamless
Custom Data Rules let you override or reformat how data appears in Seamless contact or company profiles and how it maps into your CRM or integrations. This is useful when the default Seamless value doesn’t match your CRM’s expected format or naming conventions.
What Custom Data Rules Do
Custom Data Rules help you:
- Override specific Seamless field values before they map into your CRM/integration
- Standardize data across your team (especially when set at the admin/owner level)
- Format fields consistently, like phone numbers, to match CRM requirements
There are two types of Custom Data Rules:
- Data Mappings
- Formatting Rules (such as Phone Formatting)
Users can access Custom Data Rules from their Settings. Click your initials in the bottom left hand corner followed by Settings then Custom Data Rules.
Data Mappings
Data Mappings allow you to create a rule that says:
“If a Seamless field has this value, replace it with that value.”
You can create mappings for:
- Contacts
- Accounts (company/account-level data)
Create a New Data Mapping (Single Rule)
1. Navigate to Custom Data Rules
2. Select either:
- Contact tab (for contact fields), or
- Account tab (for company/account fields)
3. Click Add New Mapping
4. Configure the rule:
- Seamless Data Field: Choose the field you want to target/override
- Operator: Select either
- Equal to (=)
- Not equal to (!=)
- Current Value: Enter/select the value currently appearing in the Seamless field
- Override Value: Enter the value you want Seamless to use instead
Adjust the Override Value to the exact Value that you would need from the CRM that you are utilizing. Now anytime that Seamless.AI Data filed is exported, the data will be overwritten before importing into your CRM
5. Save the mapping
6. If you want to add more Custom Mappings, repeat the process.
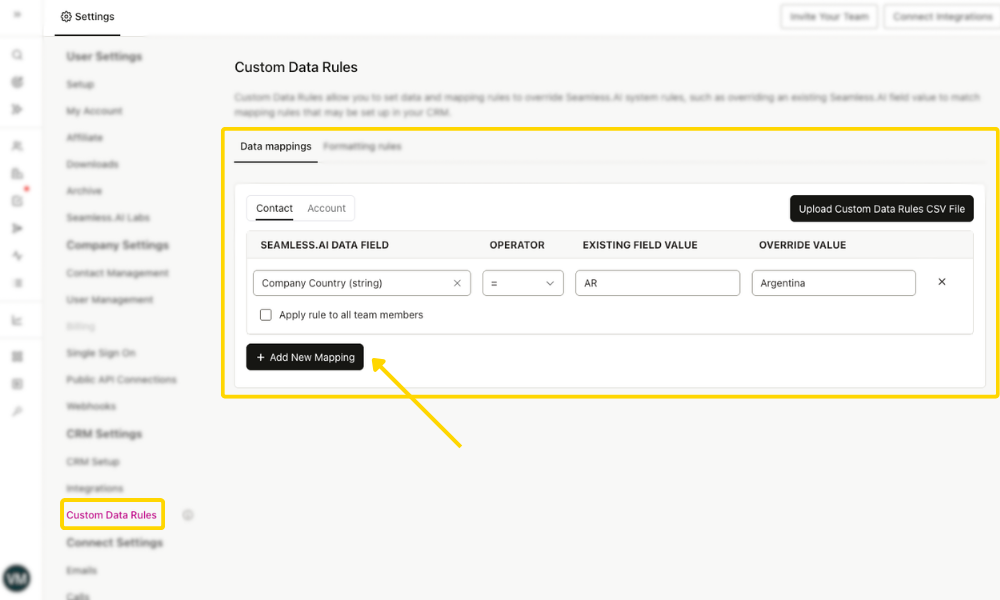
Example Mapping
If a profile location contains AR and you want it to map as Argentina (instead of being interpreted as Arizona), you can create a mapping like:
- Field: Contact Location
- Operator: Equal to (=)
- Current Value: AR
- Override Value: Argentina
This ensures your CRM receives the corrected value automatically.
Apply Mappings for Your Whole Team (Owners/Admins)
If you are an Owner or Admin of your Seamless, you may have the option to apply the mapping to all members.
This is ideal when you want:
- team-wide consistency
- a one-time fix that everyone benefits from
- fewer manual adjustments by individual users
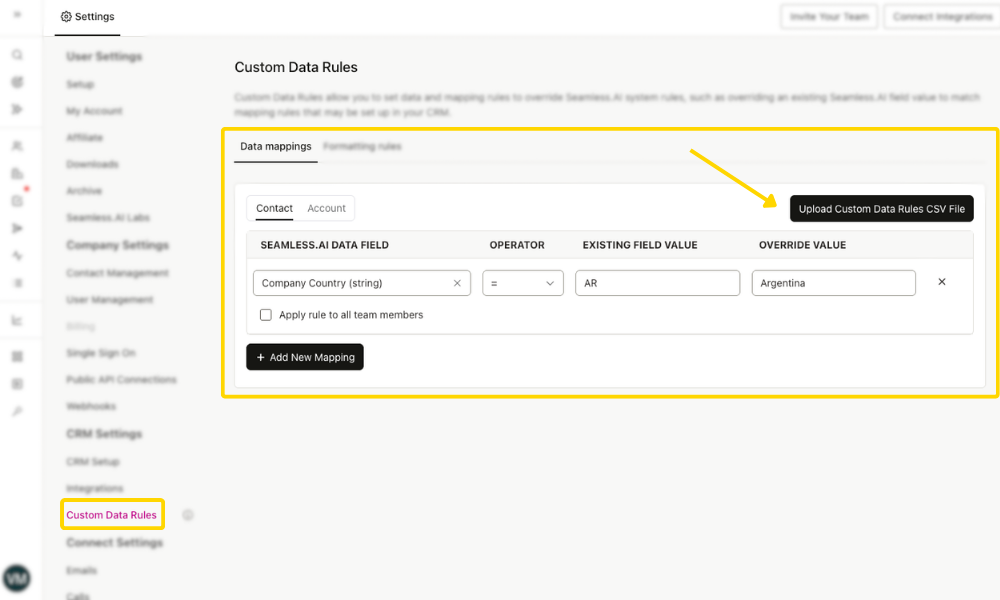
Upload Data Mappings in Bulk (CSV)
If you already have many mappings prepared (for example, in a spreadsheet), you can upload them in bulk:
- Go to Custom Data Rules
- Click Upload Custom Data Rule CSV File
- Upload your CSV
Formatting Rules
Formatting Rules let you reformat how certain data is displayed in Seamless and how it maps into your CRM.
Update Phone Formatting
- Go to Custom Data Rules
- Open the Formatting Rules section
- Select Phone Formatting
- Choose the format you want:
- Dot format: 123.456.7890 (default in Seamless)
- Dash format: 123-456-7890
- Standard U.S. format: (123) 456-7890
- Space format: 123 456 7890
- Click Save
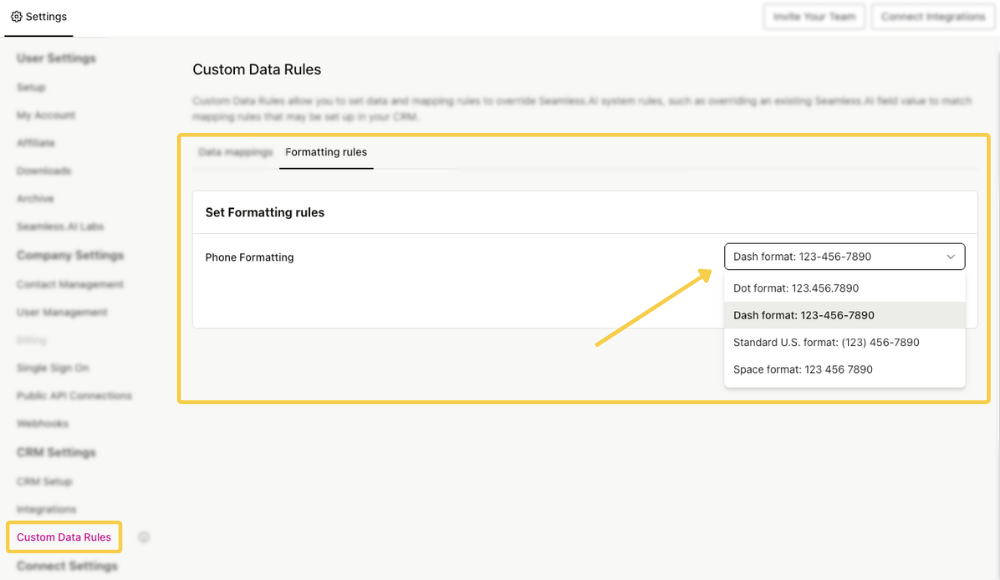
Once saved, this updates:
- how phone numbers display inside Seamless contact profiles
- how phone numbers map into your CRM/integrations

Tips & Best Practices
- Use Data Mappings when you need to translate or correct values (abbreviations, internal codes, naming conventions).
- Use Formatting Rules when your CRM requires a specific display format (especially for phone numbers).
- If you manage a team, set mappings account-wide so everyone stays consistent without manual setup.