Assigning Licenses, Credits, and Managing Your Organization
Any user with Owner or Admin privileges can assign or remove licenses when needed after they've been purchased. They also have the authority to completely revoke a user's access to the organization.
Track license/credit usage, add licenses, and send invites to colleagues in your organization to start driving leads with Seamless!
Assigning Licenses
Owners and Admins in Seamless AI have full control over user access and credit distribution. From assigning licenses to managing Universal Credits, Buyer Intent topics, and user permissions, everything is managed in Settings → User Management.
This guide will show how to configure your team, control org-level usage, and ensure everyone has the access they need to maximize their Seamless account.
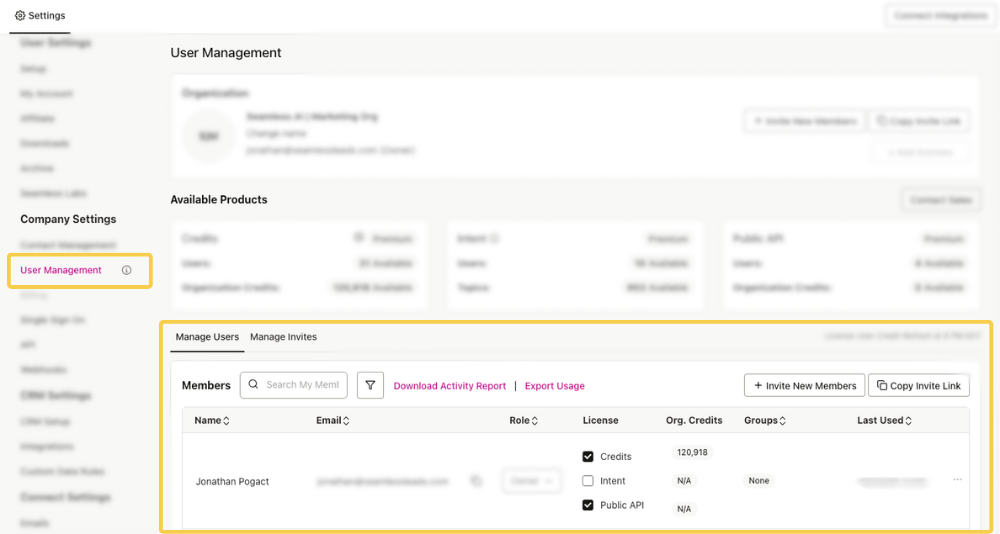
Accessing User Management
User Management is accessible to only Owners and Admins of Seamless organizations. From this page, Owners and Admins can invite new users, assign or remove licenses, allocate licenses and Universal Credits, manage user roles (Admin/User), and create user groups.
To access User Management:
- Click your initials in the bottom left corner.
- Go to Settings → Company Settings
- Open User Management.
Inviting New Users
Whether you are looking to get your team first set up, or add new members to your Seamless organization, you will need to Invite Users.
Sending Invite by Email
- Seamless Owner or Admin will access the User Management page.
- Click the “Invite New Members” button in the top-right corner. A modal will open to:
- Enter the user’s email.
- (Optional) Select a User Group.
- Assign a license (Standard or Universal Credits). This will help the user to have access to their credits right away, rather than needing to wait for Admin or Owner to modify license access.
- Update the user’s access level to an Administrator, if desired.
Invite additional users at the same time, through following the above steps.
- Send the invite.
Using Invite Link
Click Copy Invite Link and send it to teammates. Anyone with the link can join your organization.
After the user accepts the invitation, a Seamless Admin or Owner will need to come back to the User Management page and assign preferred licenses.
Track Pending Invites
Scroll down to the Manage Users section, and click on the Manage Invites tab to see current status to those who have been invited. A great way to track and monitor invited users.
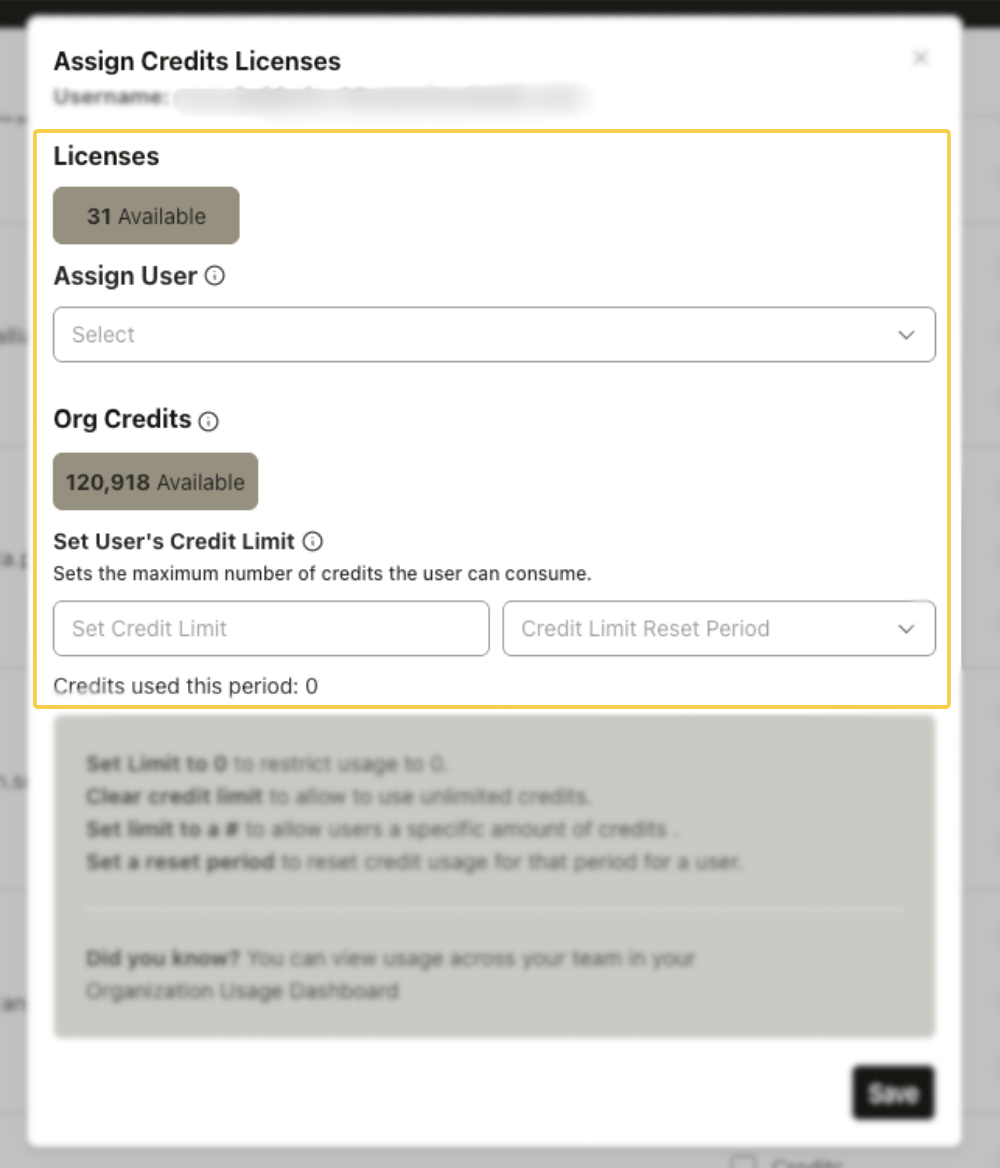
Assigning Credits and Licenses
Licenses give users a set number of credits and routine refresh period. Owners or Admins can assign licenses to users easily through the User Management page.
To learn more about Licenses and Credit Refresh Cycle, check out this article: Seamless Credit and License Types
To assign these licenses:
- In Manage Users, locate the user.
- Check the Credits checkbox next to their name.
- A modal will appear to select and assign available Licenses or Universal Org Credits.
- Select the license(s) to assign to that user.
- Click Save.
Helpful Tip: If you need more licenses, click Add Licenses in the User Management page to see pricing and purchase additional seats.
Assigning Universal Credit Allowances
Universal Credits can also be assigned in bulk to users without assigning a license.
Owner and Admins can assign Universal Credits to users by:
- In Manage Users, locate the user.
- Check the Credits checkbox next to their name.
- A modal will appear to select and assign available Licenses or Universal Org Credits.
- If you do not want to assign users a license, but rather set your own credit allowance in the Org Credit section.
Universal Credits can be assigned as Open (default setting) or with a User Credit Limit.
To set a certain credit limit for a user from the main pool of Seamless organization credits, simply add them credit limit and preferred refresh frequency. - Click Save.
Open Universal Org Credit (Default Setting)
By default, Universal Credits are assigned as Open to all users to share organization’s their Universal Credit pool freely. In the Org Credits Section, you will see the total number of Universal Credits available in the organization.
There are no per-user limits required. This is best for small teams or orgs with flexible usage needs.
Restricted Universal Credits (Requires Credit Assignment)
Restricted mode lets admins control how many Universal Credits each user can access. While credits will still come from the Organization’s Universal Credit pool, the number of credits a user can access will be restricted to a desired cadence. Restricted credit limits can help control organization wide consumption
With setting Universal Credit limits, admins can set a maximum credits per user and a cadence for when credits reset (daily, weekly, monthly, or yearly). For example, admins can set that user is limited to a maximum of 750 credits per day.
This limit can be customized per user, and does not need to be the same across the organization.
To assign credits:
- Check the Universal Credits box next to a user.
- Enter the number of credits you want to assign.
- Set a Credit Reset Period (Daily, Weekly, Monthly, or Yearly).
- Save changes.
Assigning Buyer Intent Licenses & Topics
Buyer Intent is a premium feature and provides signals based on topics your buyers actively research. Assign Buyer Intent licenses as needed to users in your organization.
How to Assign Buyer Intent
- In Manage Users, locate the user.
- Check the Intent checkbox next to their name.
- A modal will appear showing license availability, click and save Intent access to the user’s account.
In this modal, you will also see the number of total topics available for the organization, and how many are currently saved to accounts in the organization.
- Click Save.
Buyer Intent Topics are pooled across the entire organization. If one user adds a topic, everyone in the organization with Intent access gains visibility, and can use the topic for a Buyer Intent search.
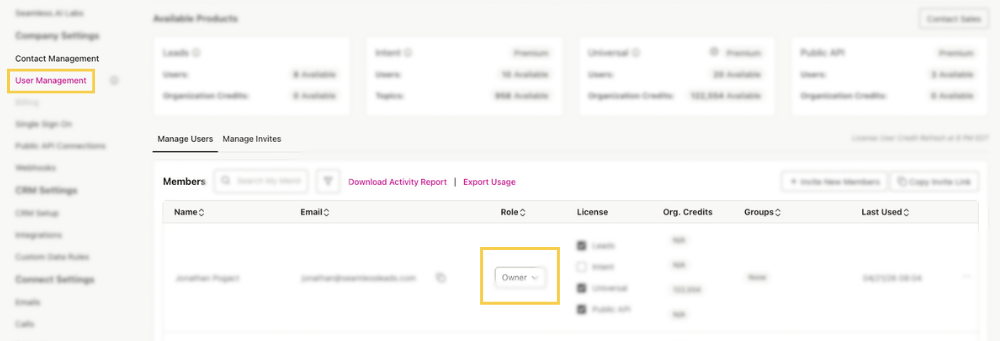
Managing User Roles (Admin vs. User)
Owners or Admins can update the role of other users based on need
Each user can be assigned one of three roles:
- User - Standard access
- Admin - Can manage settings, credits, users, and org configurations
- Owner - Typically the person signing the contract and the one responsible for the billing status and agreement of the account. An owner can make any changes to the organization and cannot be removed by anyone else but themselves.
To update a role:
- Go to Manage Users.
- Find the user.
- Use the dropdown next to their name to switch between User and Admin.
Removing a User from Your Organization
- Go to Settings → User Management.
- Click the three dots next to the user's profile.
- Select Remove Member.
- Confirm removal.
Pro-Tip
Pro Tip: Removed users can still log into their personal Seamless AI account and access saved contacts. If you must completely revoke access to an org-funded account, contact help@success.seamless.ai.
Creating & Assigning User Groups
User groups can be used to separate different members of your team into different groups for additional reporting metrics through the User Management menu. They can help to organize users, monitor credit usage, and view team level insight in Team Dashboards.
How to Create a User Group
- In Manage Users, locate the user.
- Click on the blue box in the Groups column
- Select a group or create a new group
- Click Save.
How to Transfer Ownership
New person taking over? Previous account owner no longer with the company?
To transfer ownership of your license and organization please contact help@success.seamless.ai so our team can assist as this requires legal transfer of ownership and billing terms.