
AI Fields
AI Fields in My Contacts help users create, organize, and manage personalized outreach at scale. This article explains how to create AI Columns and Text Columns, run AI prompts, use dynamic variables, edit columns, and apply best practices for building outreach messages across email, calls, LinkedIn, and other workflows.
Use AI Fields in My Contacts
AI Fields in My Contacts give users a flexible way to create personalized messaging at scale. Whether you want AI to generate messaging for each contact or you want to build your own reusable message manually, AI Fields make it easier to organize and manage outreach directly inside your contact list.
Users can create two types of AI Fields:
- AI Columns for AI-generated messaging based on a prompt and cost 0.2 credits per contact the prompt is run on.
- For example if you run a prompt on 100 contacts it will use 20 credits from your credit balance.
- Text Columns for manually written messaging with support for dynamic variables, links, and text formatting
- Unlike AI Fields, Text Fields do not use credits and can be used across your contact list at no cost.
This feature can be used to tailor messaging for a single contact or for your entire My Contacts library.
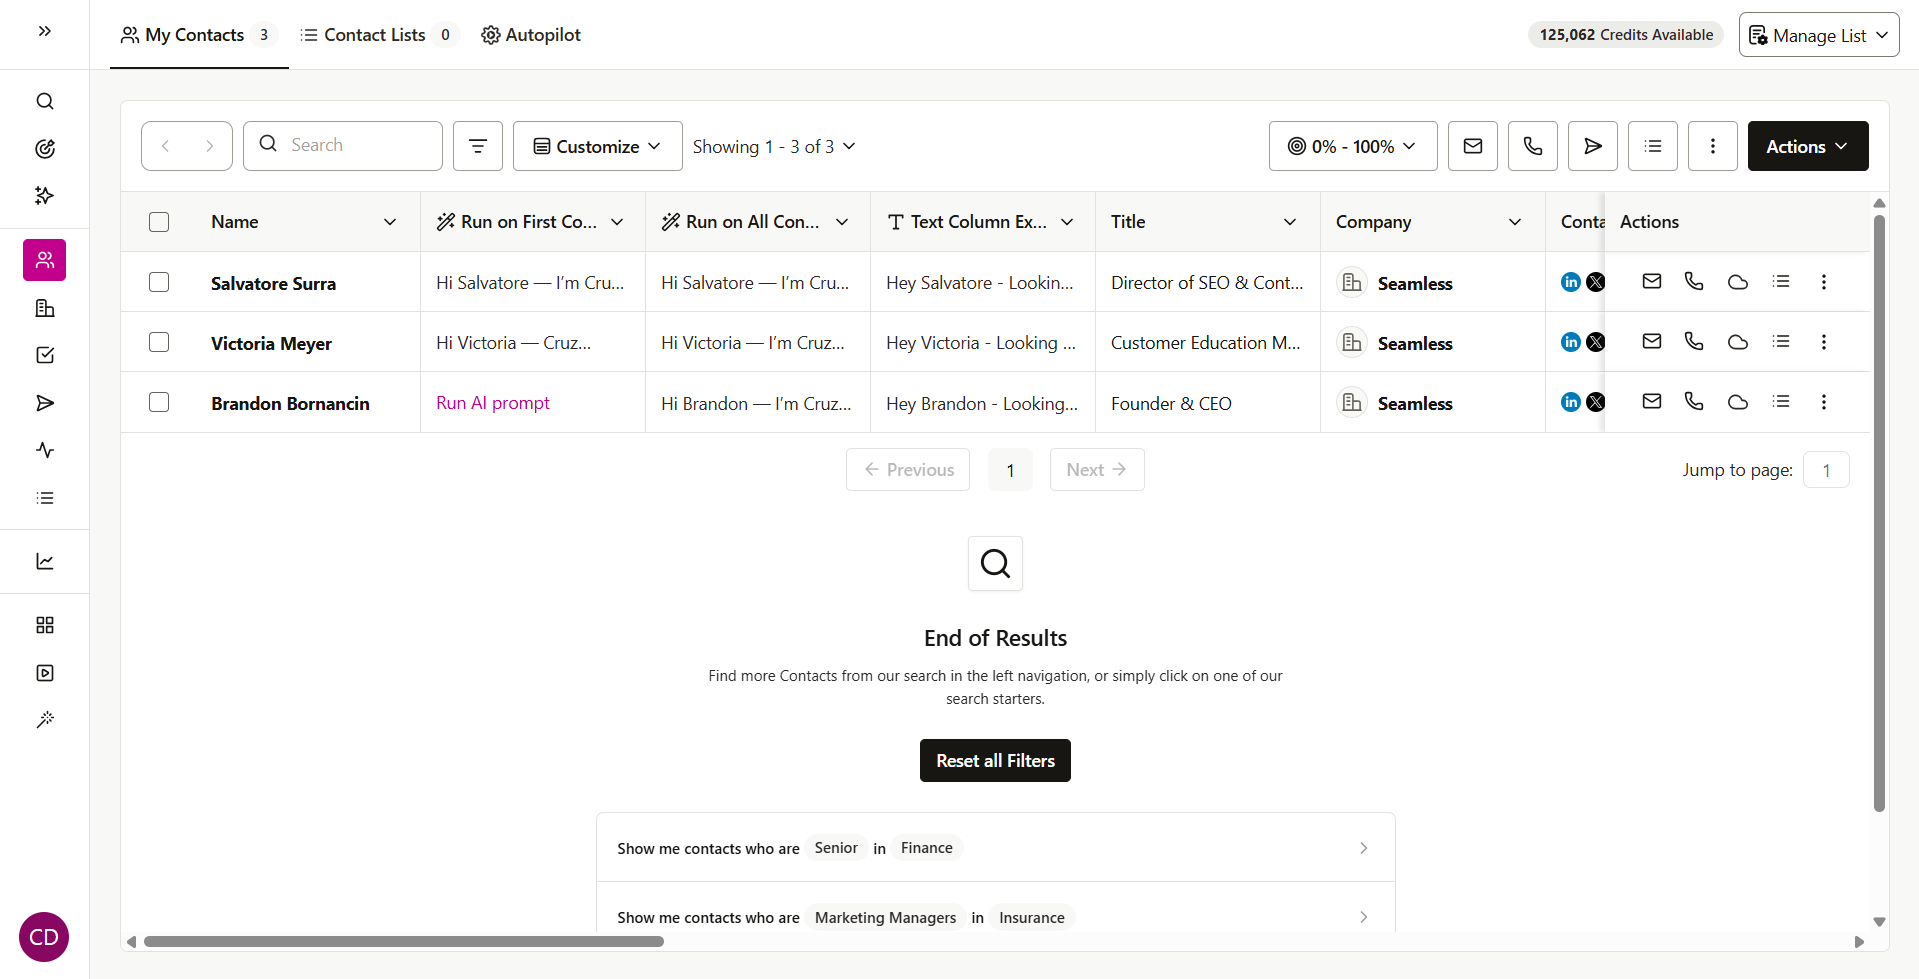
Why Use AI Fields
AI Fields help users build and store messaging directly alongside their contacts. This makes it easier to prepare personalized outreach, keep messaging organized, and quickly reference or update content without leaving My Contacts.
With AI Fields, users can:
- Generate personalized outreach with AI
- Create reusable manual messaging
- Store messaging directly in the contact table
- Update messaging for one contact or an entire column
- Tailor content for channels like email, calls, or LinkedIn
Where to Find AI Fields
To create a Custom Column:
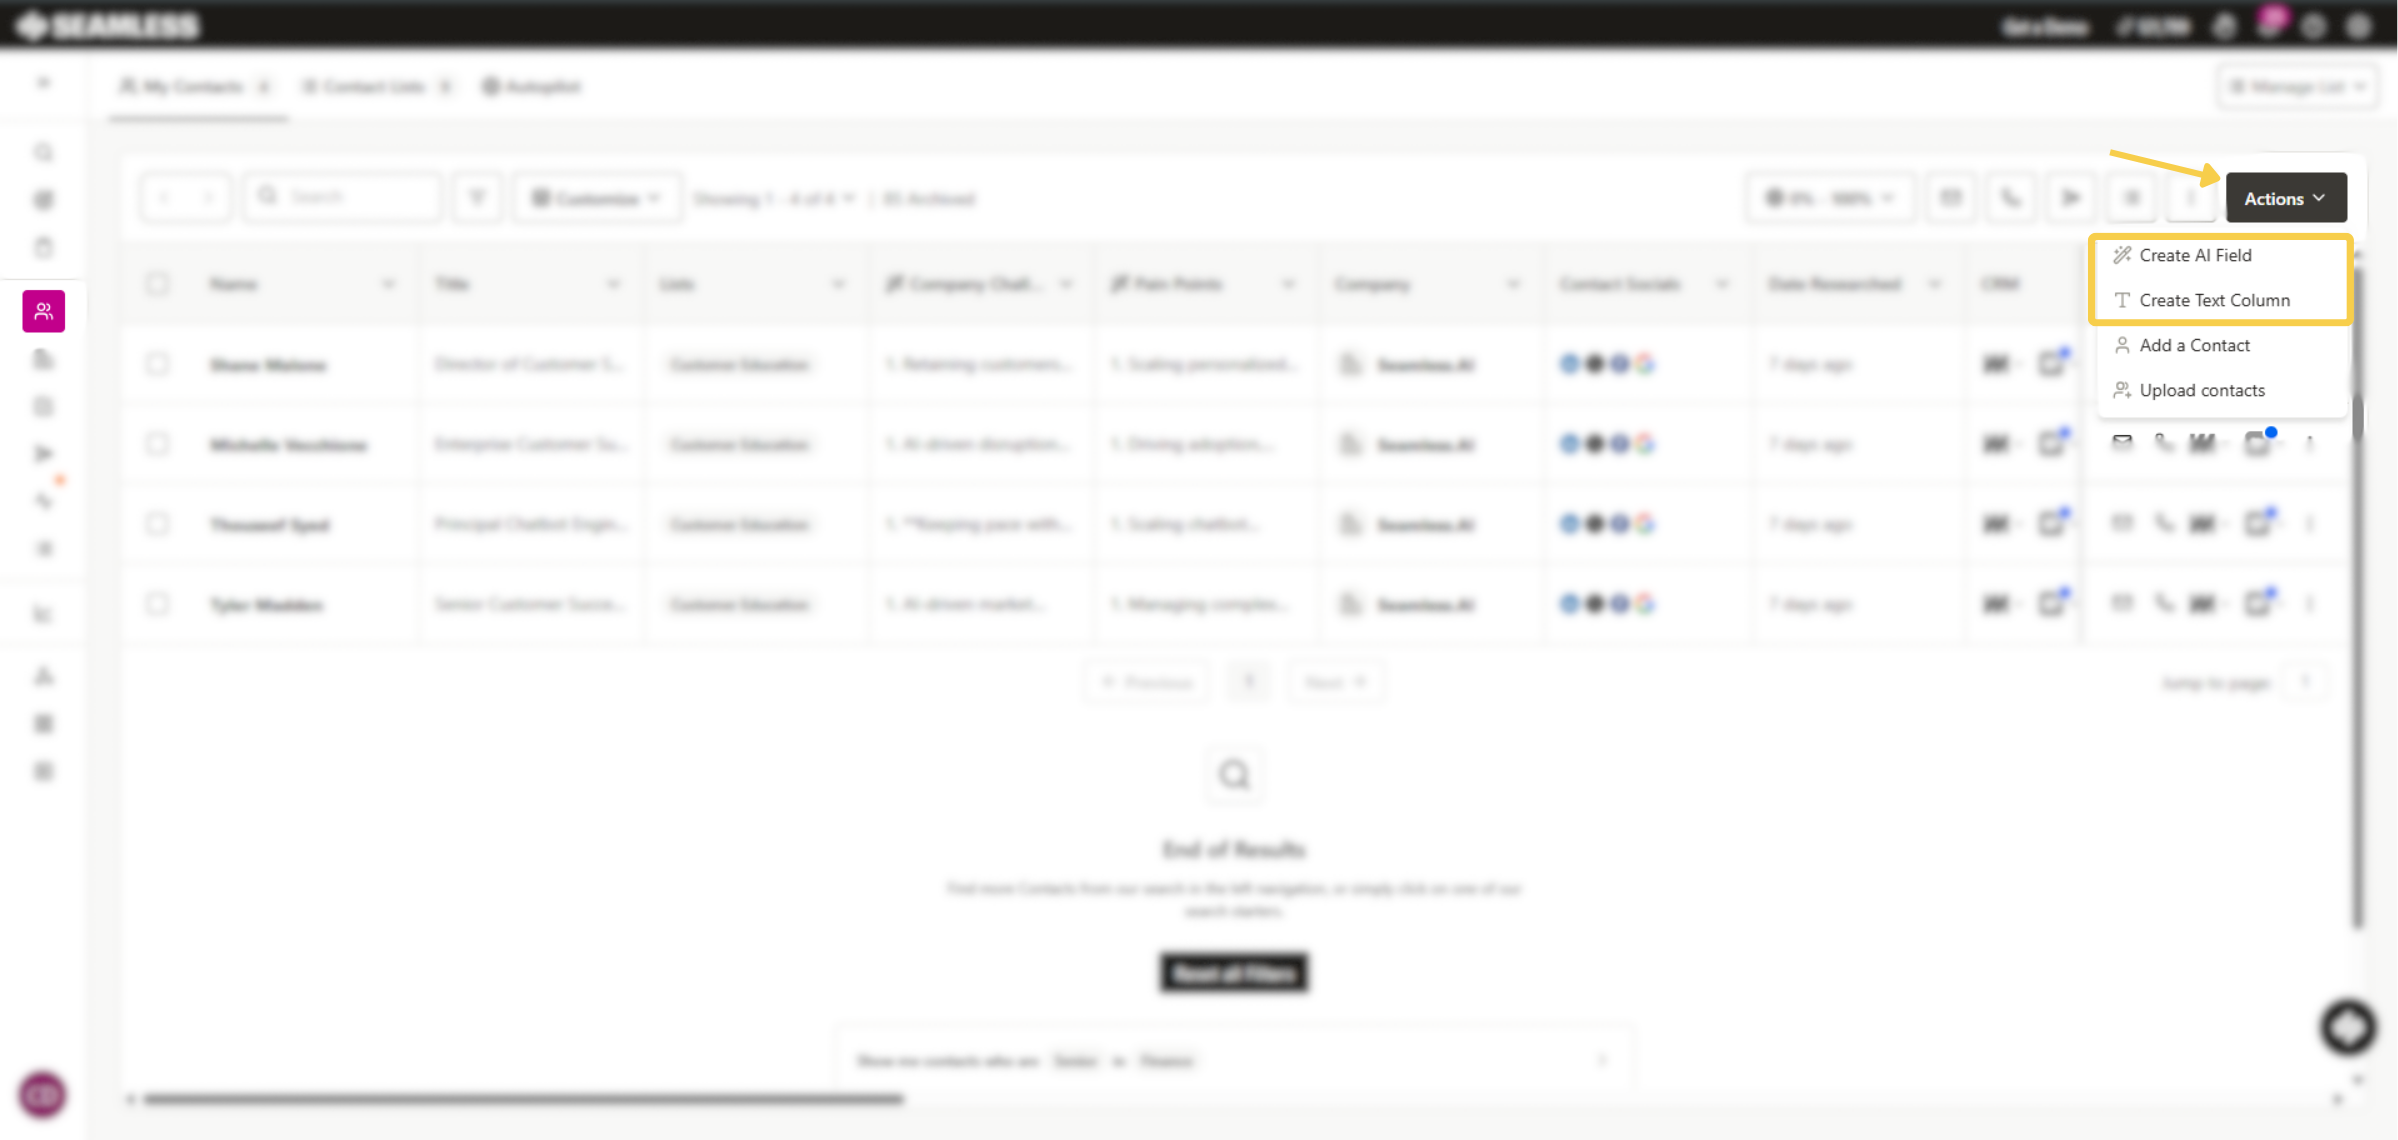
- Go to My Contacts
- Click the Actions button in the top right
- Choose either:
- Create AI Column
- Create Text Column
Once selected, a flyout will open where you can build your new column.
Create an AI Column
AI Columns allow users to generate messaging automatically using a prompt.
When creating an AI Column, users will be able to:
- Name the column
- Choose the channel the message is for, such as:
- Call
- LinkedIn Message
- Enter the prompt the AI should use to generate messaging
After entering a prompt, users can click the up arrow icon to run the AI. Once complete, a preview of the message will appear below the prompt.
If the user wants to refine the output, they can update the prompt and click the refresh icon to generate a new version of the message.
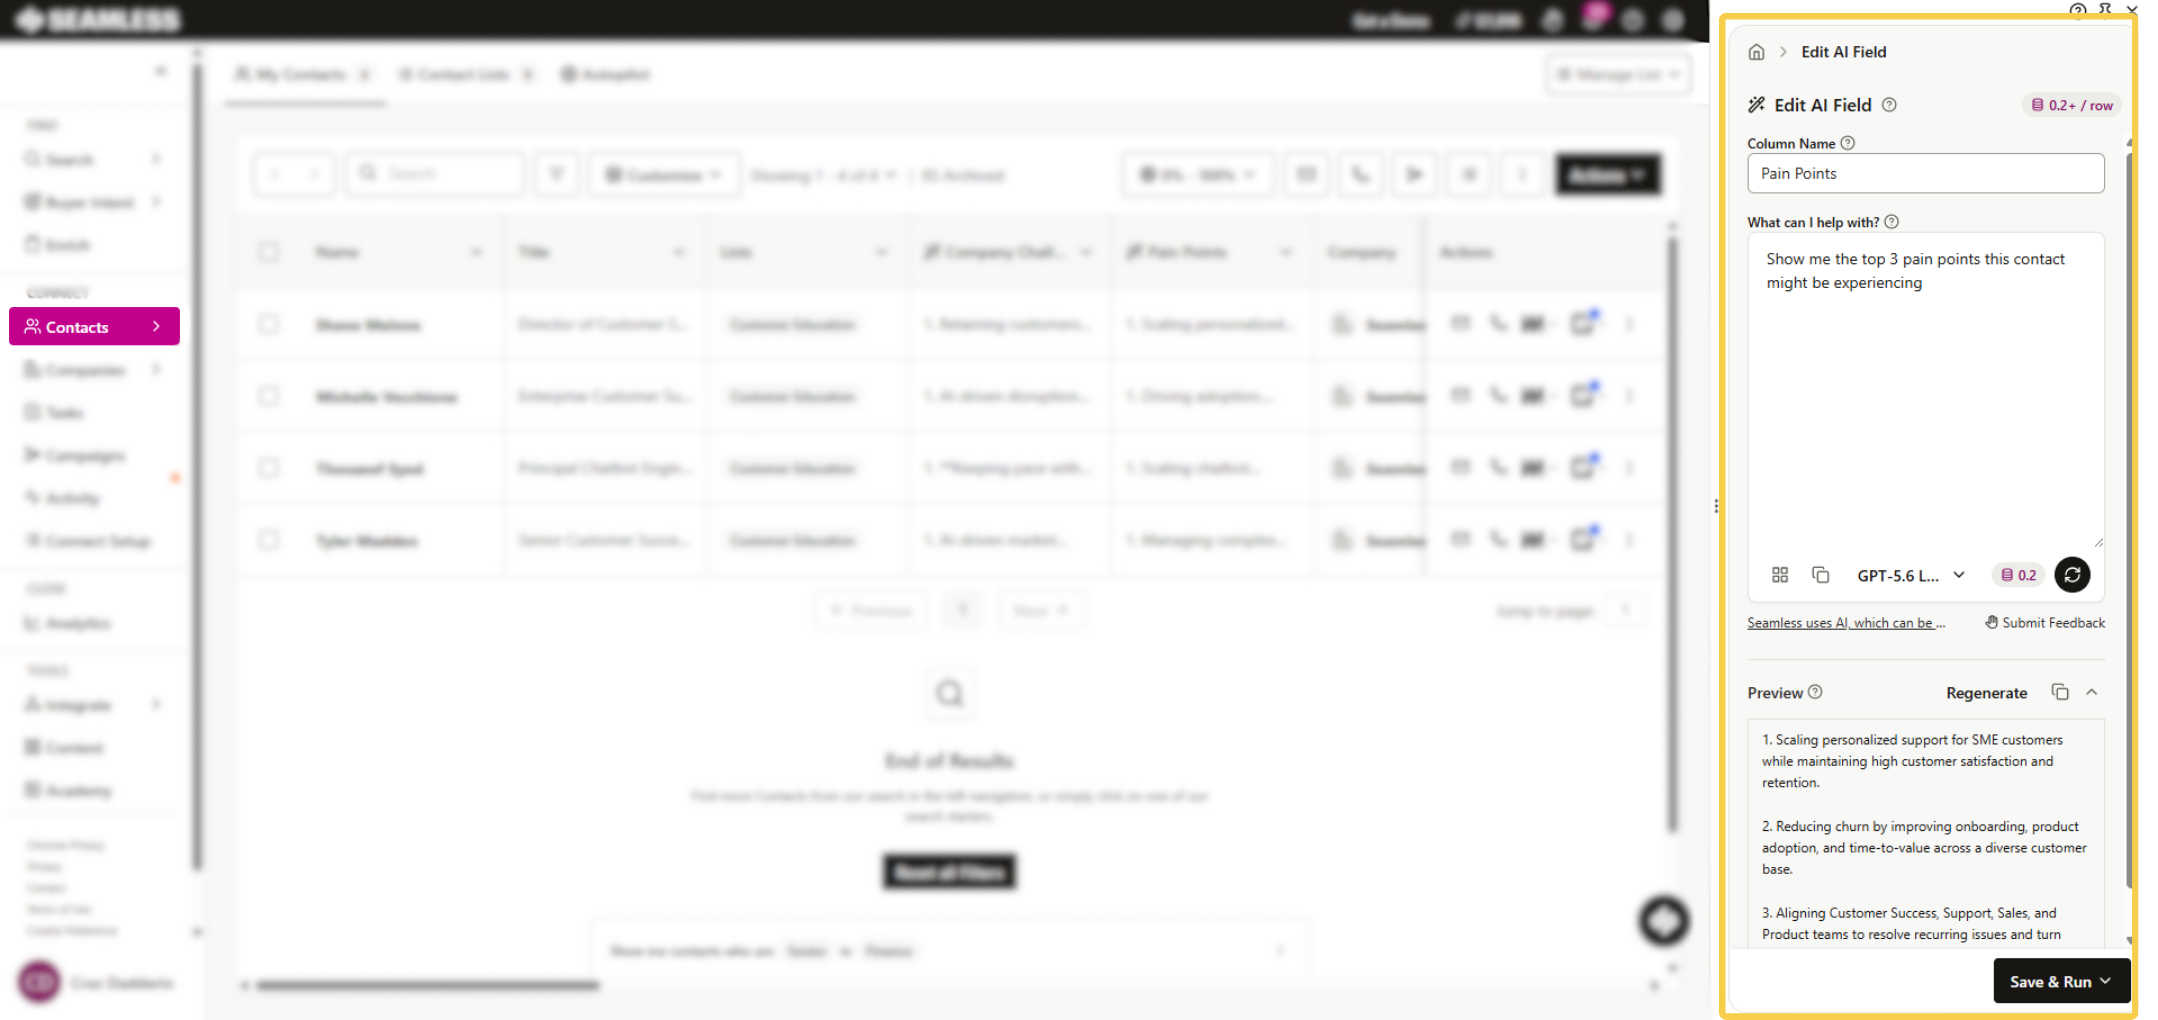
When the prompt is ready, users can click Save & Run and choose from the following options:
Run on first contact
This creates the column and generates messaging only for the first contact. All other contacts in the column will display Run AI Prompt, which users can click if they want to generate messaging for that specific contact later.
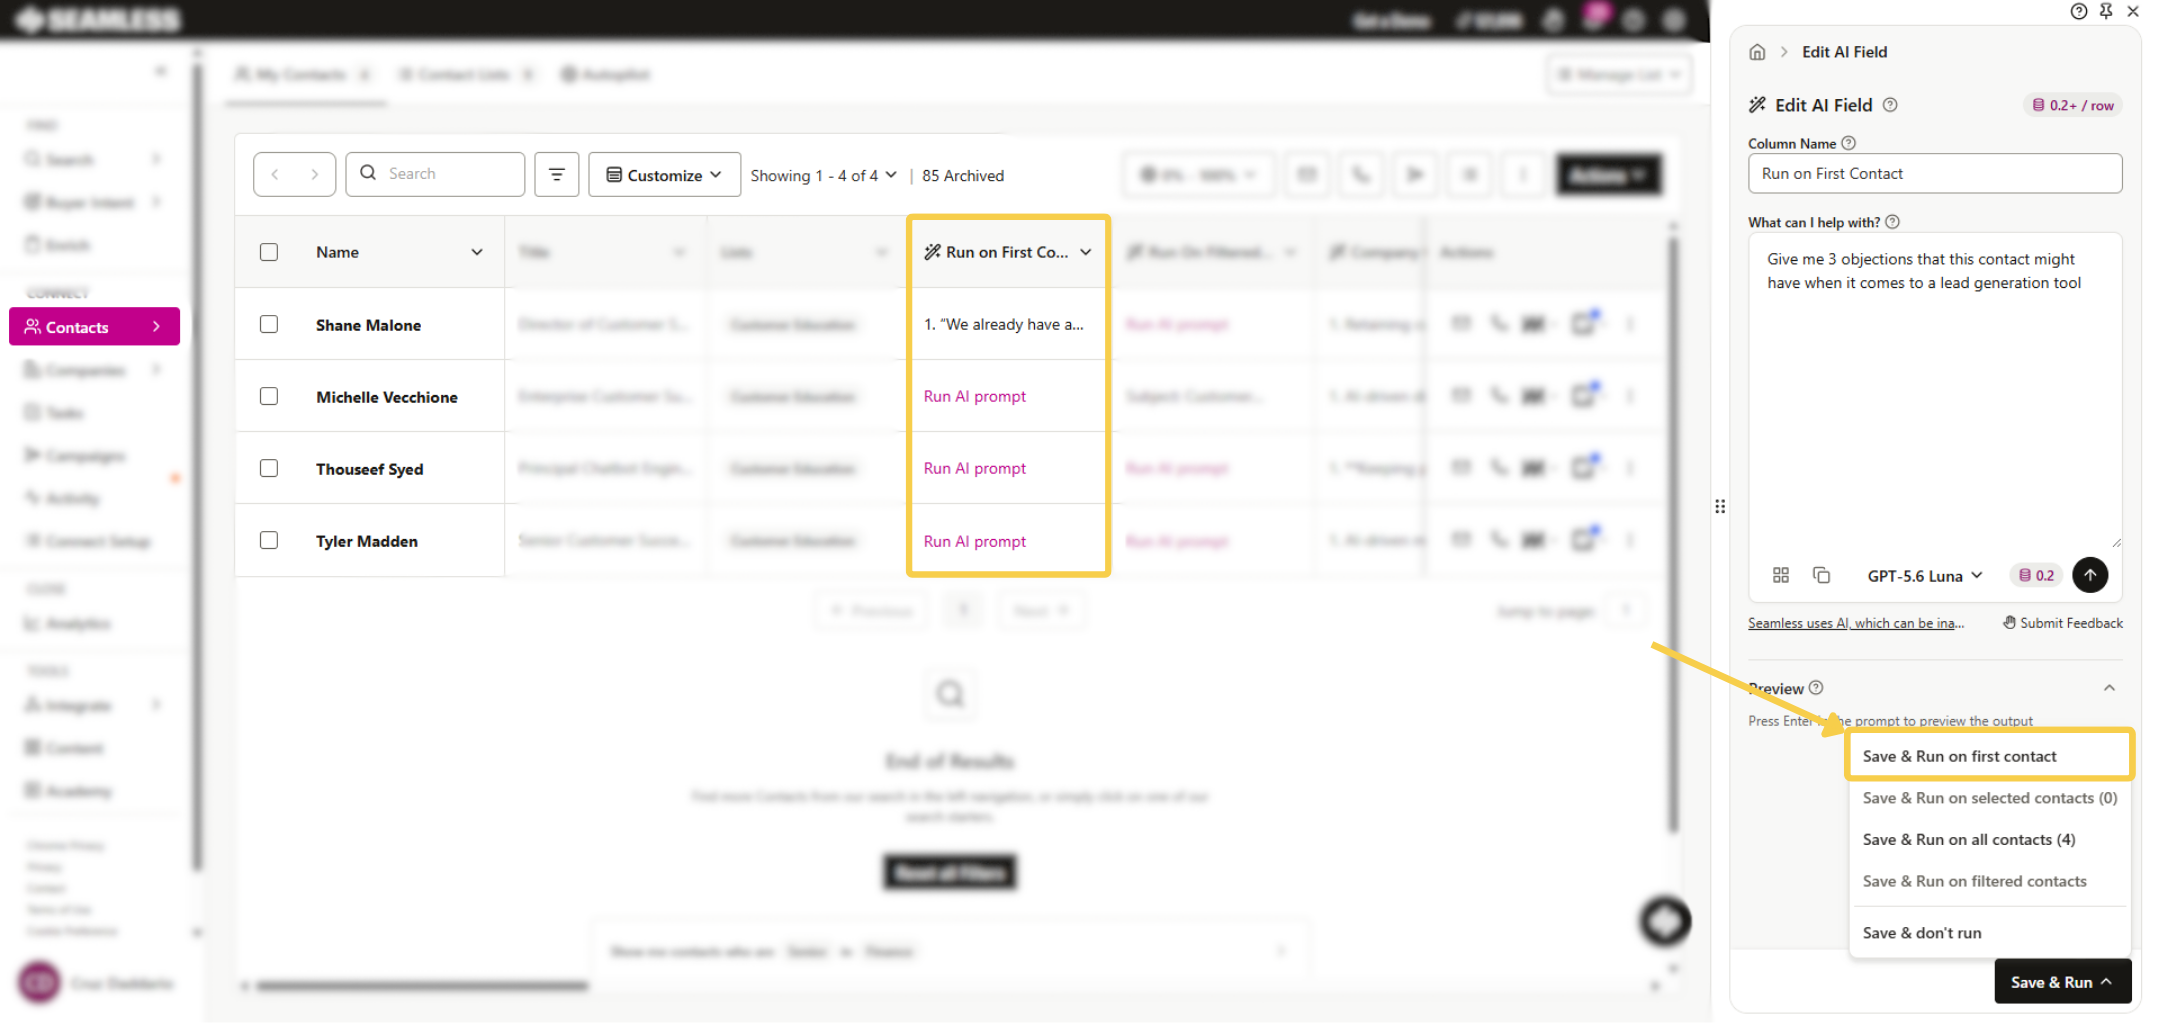
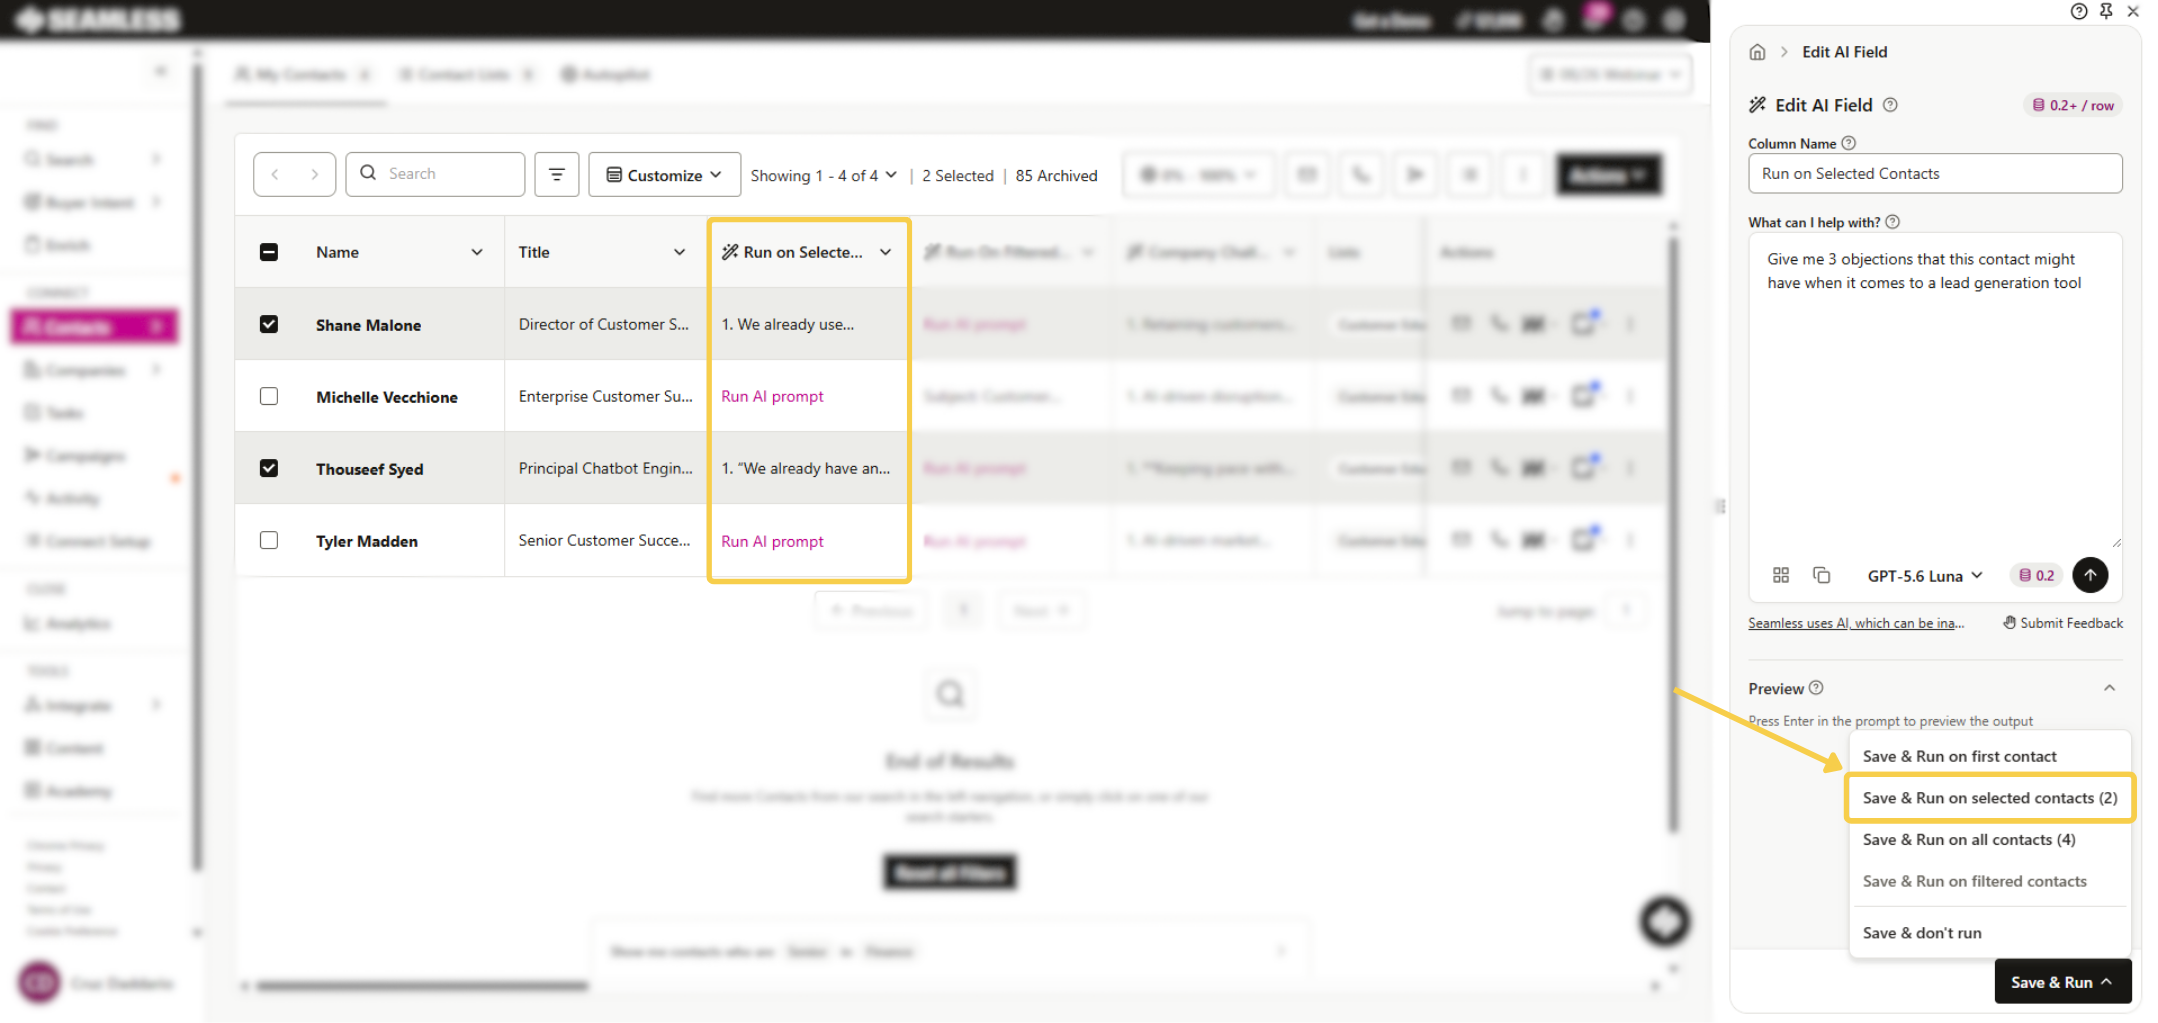
Run on selected contacts
This creates the column and generates messaging only for the contacts you selected using the checkboxes on the left side of the Contacts. Contacts that were not selected will not have messaging created in that run.
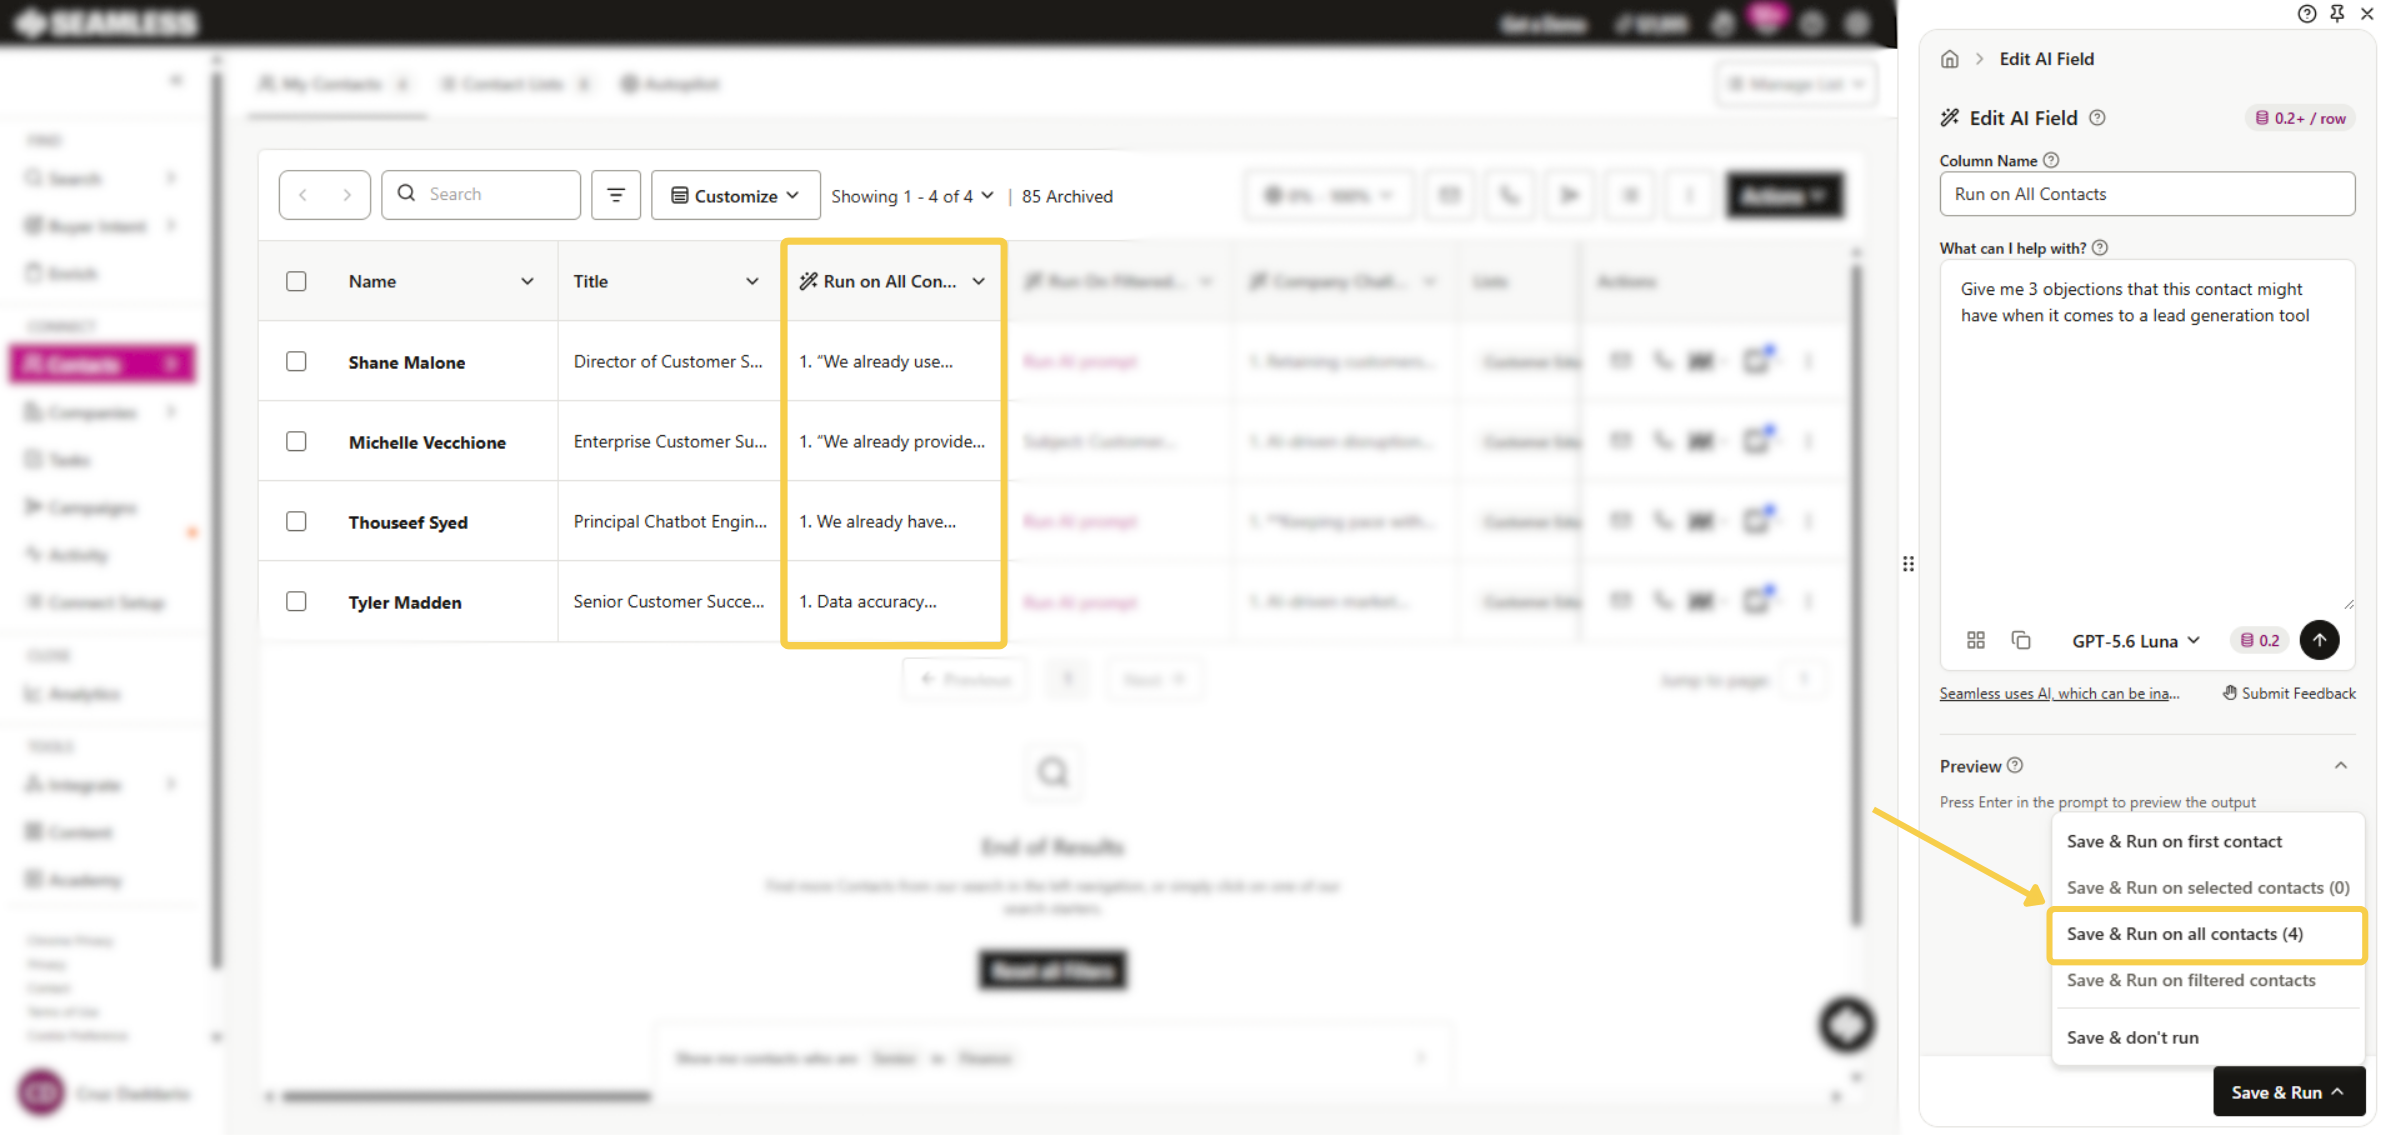
Run on all contacts
This creates the column and automatically generates messaging for all contacts in that new column.
Note: depending on the size of your contact list, this may take a few minutes to complete - the larger the list, the longer the processing time.
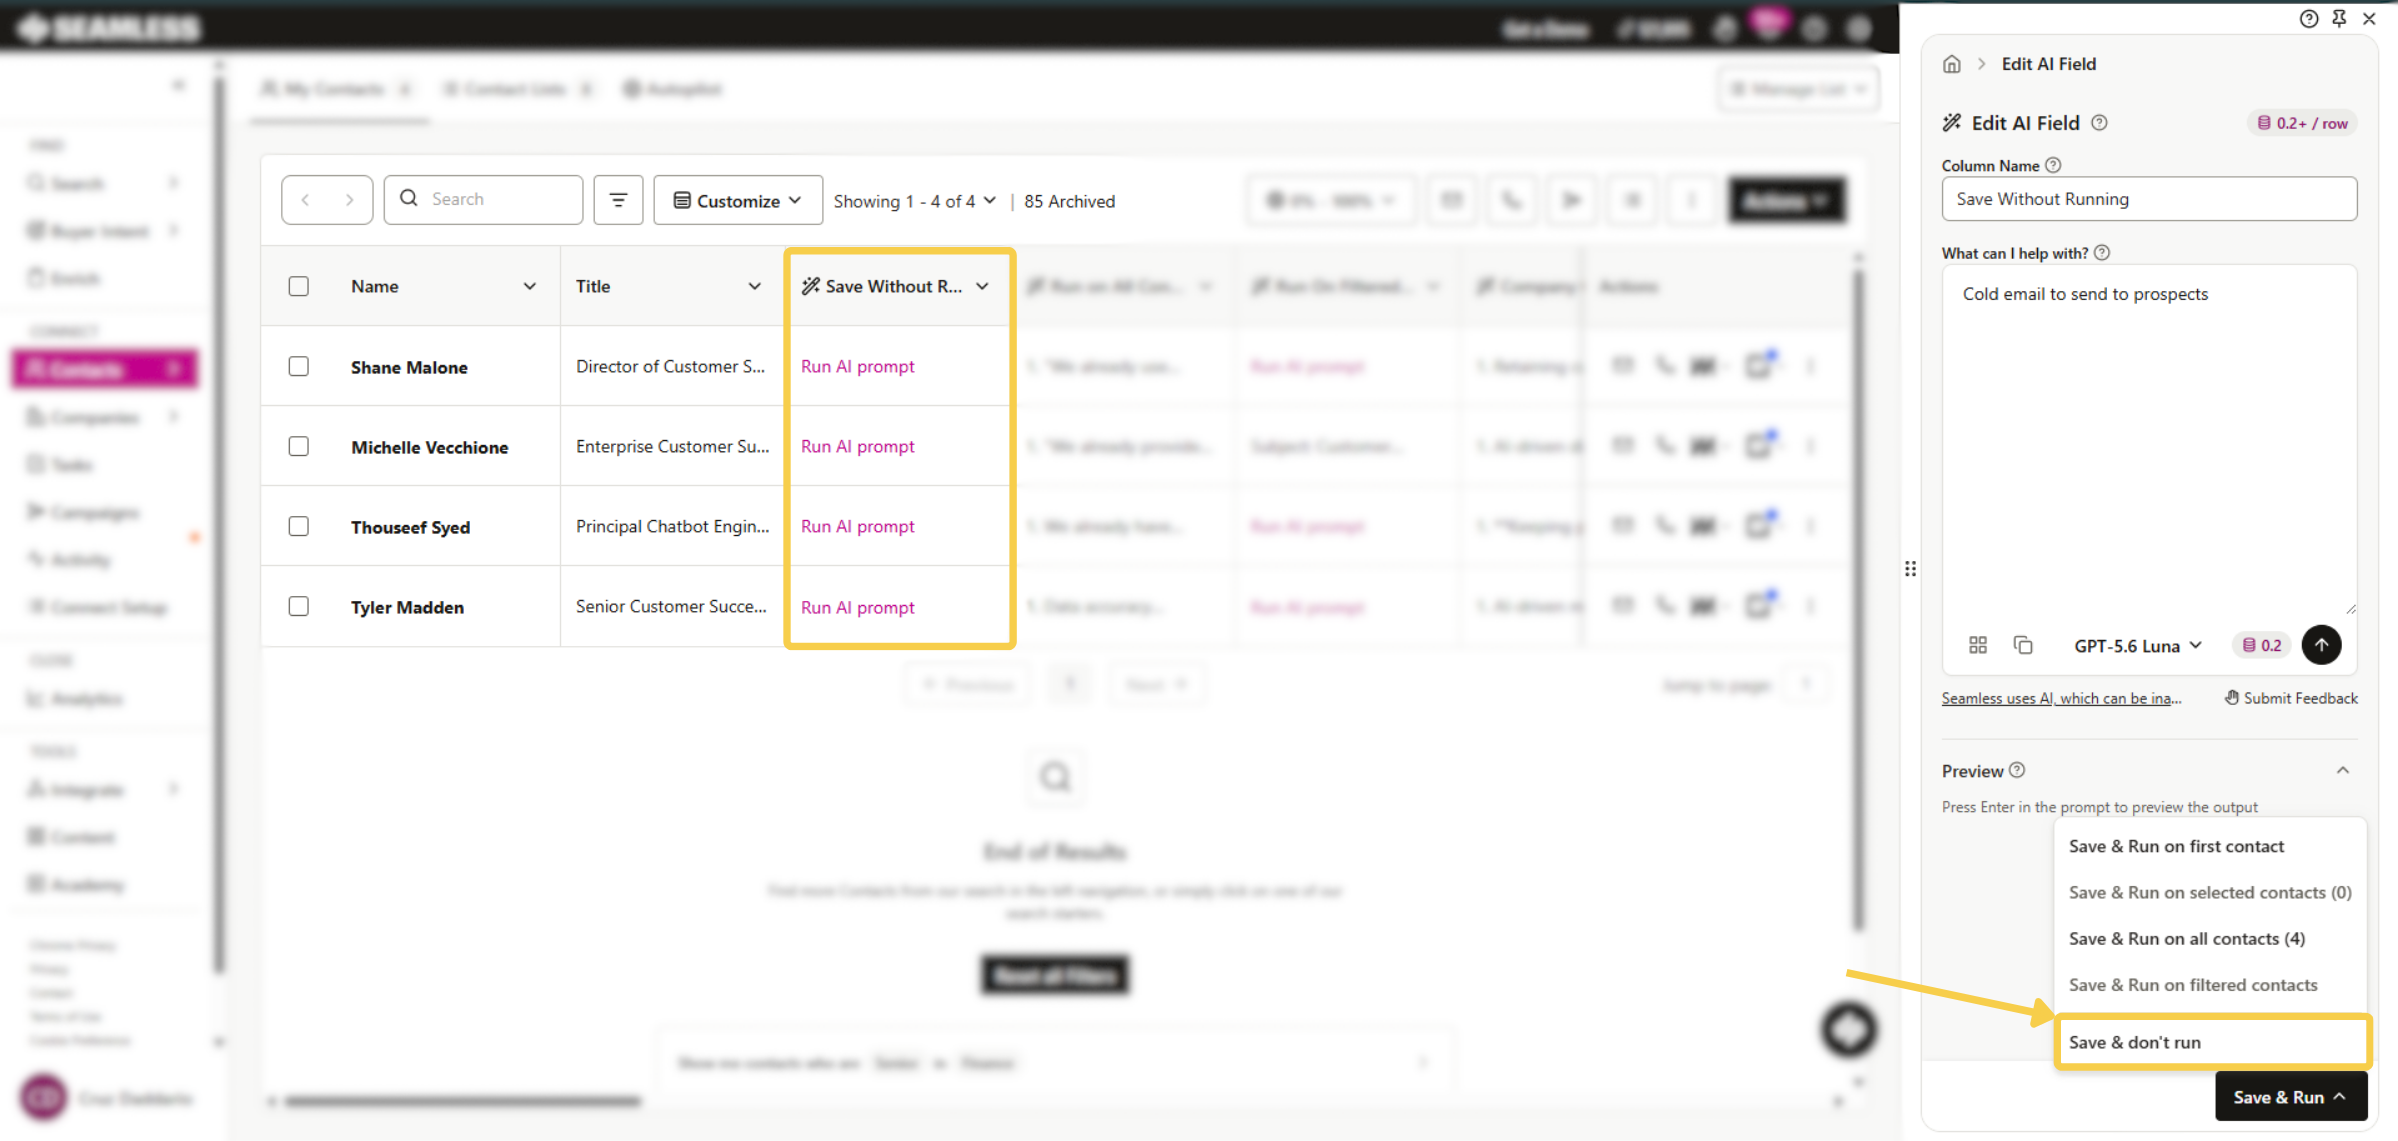
Save without running
This creates the column without generating messages for the rest of the contacts. The Run AI Prompt option will appear for contacts in that column so users can generate messaging as needed.
Create a Text Column
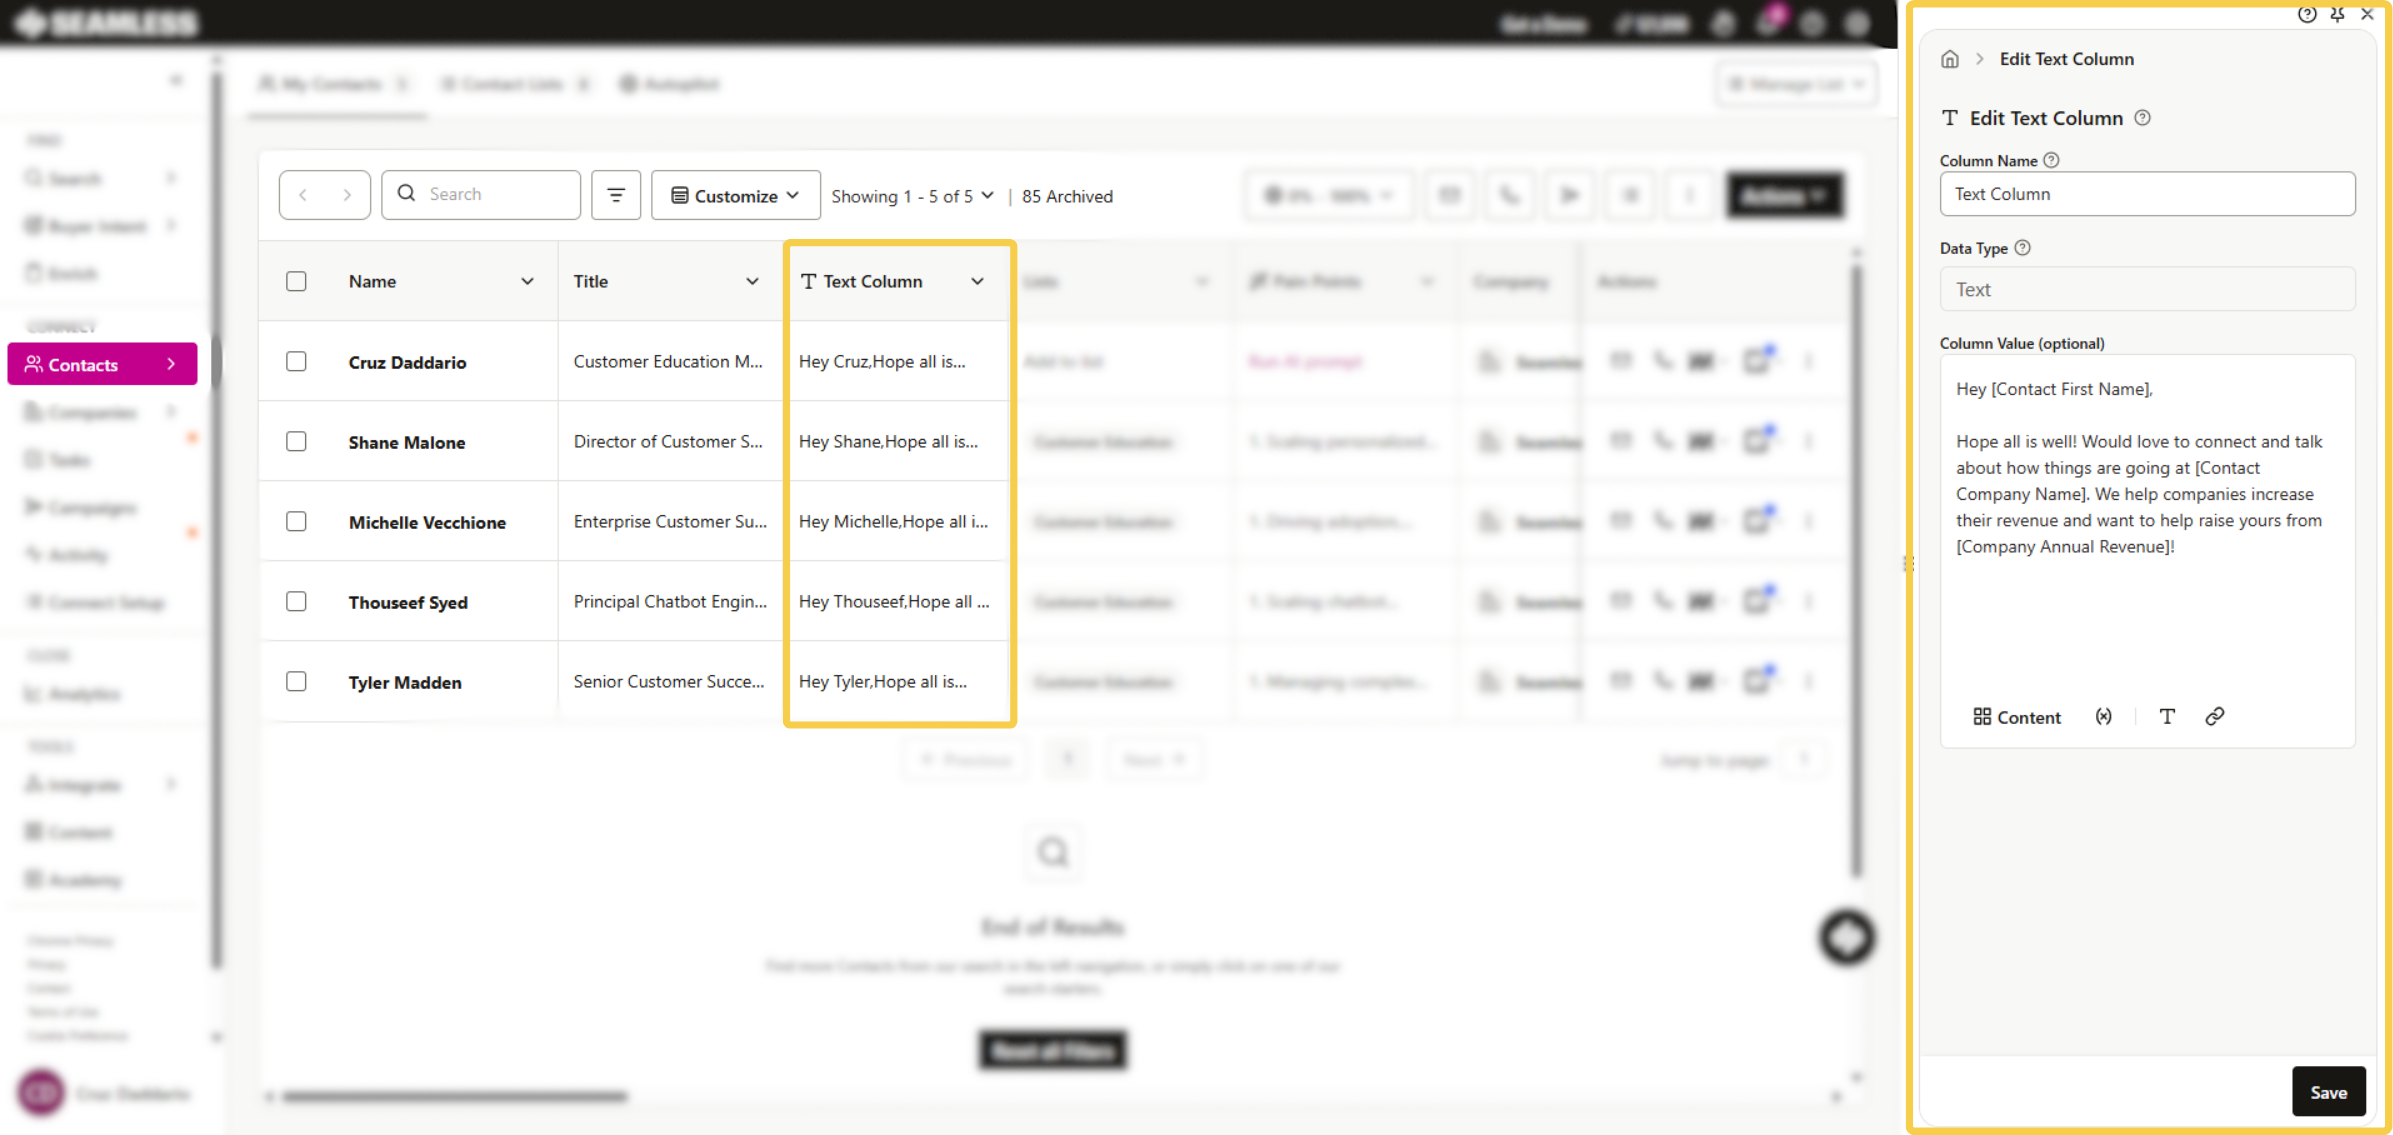
Text Columns allow users to create messaging manually instead of using AI.
When creating a Text Column, users can:
- Name the column
- Write their own message
- Add dynamic variables
- Insert links
- Edit text styles and formatting
Once the message is ready, click Save in the bottom right. This will create the column and populate it with the saved message, including any dynamic variables for each contact.
Editing AI Columns
After an AI Column is created, users can continue making edits as needed.
Edit messaging for one contact
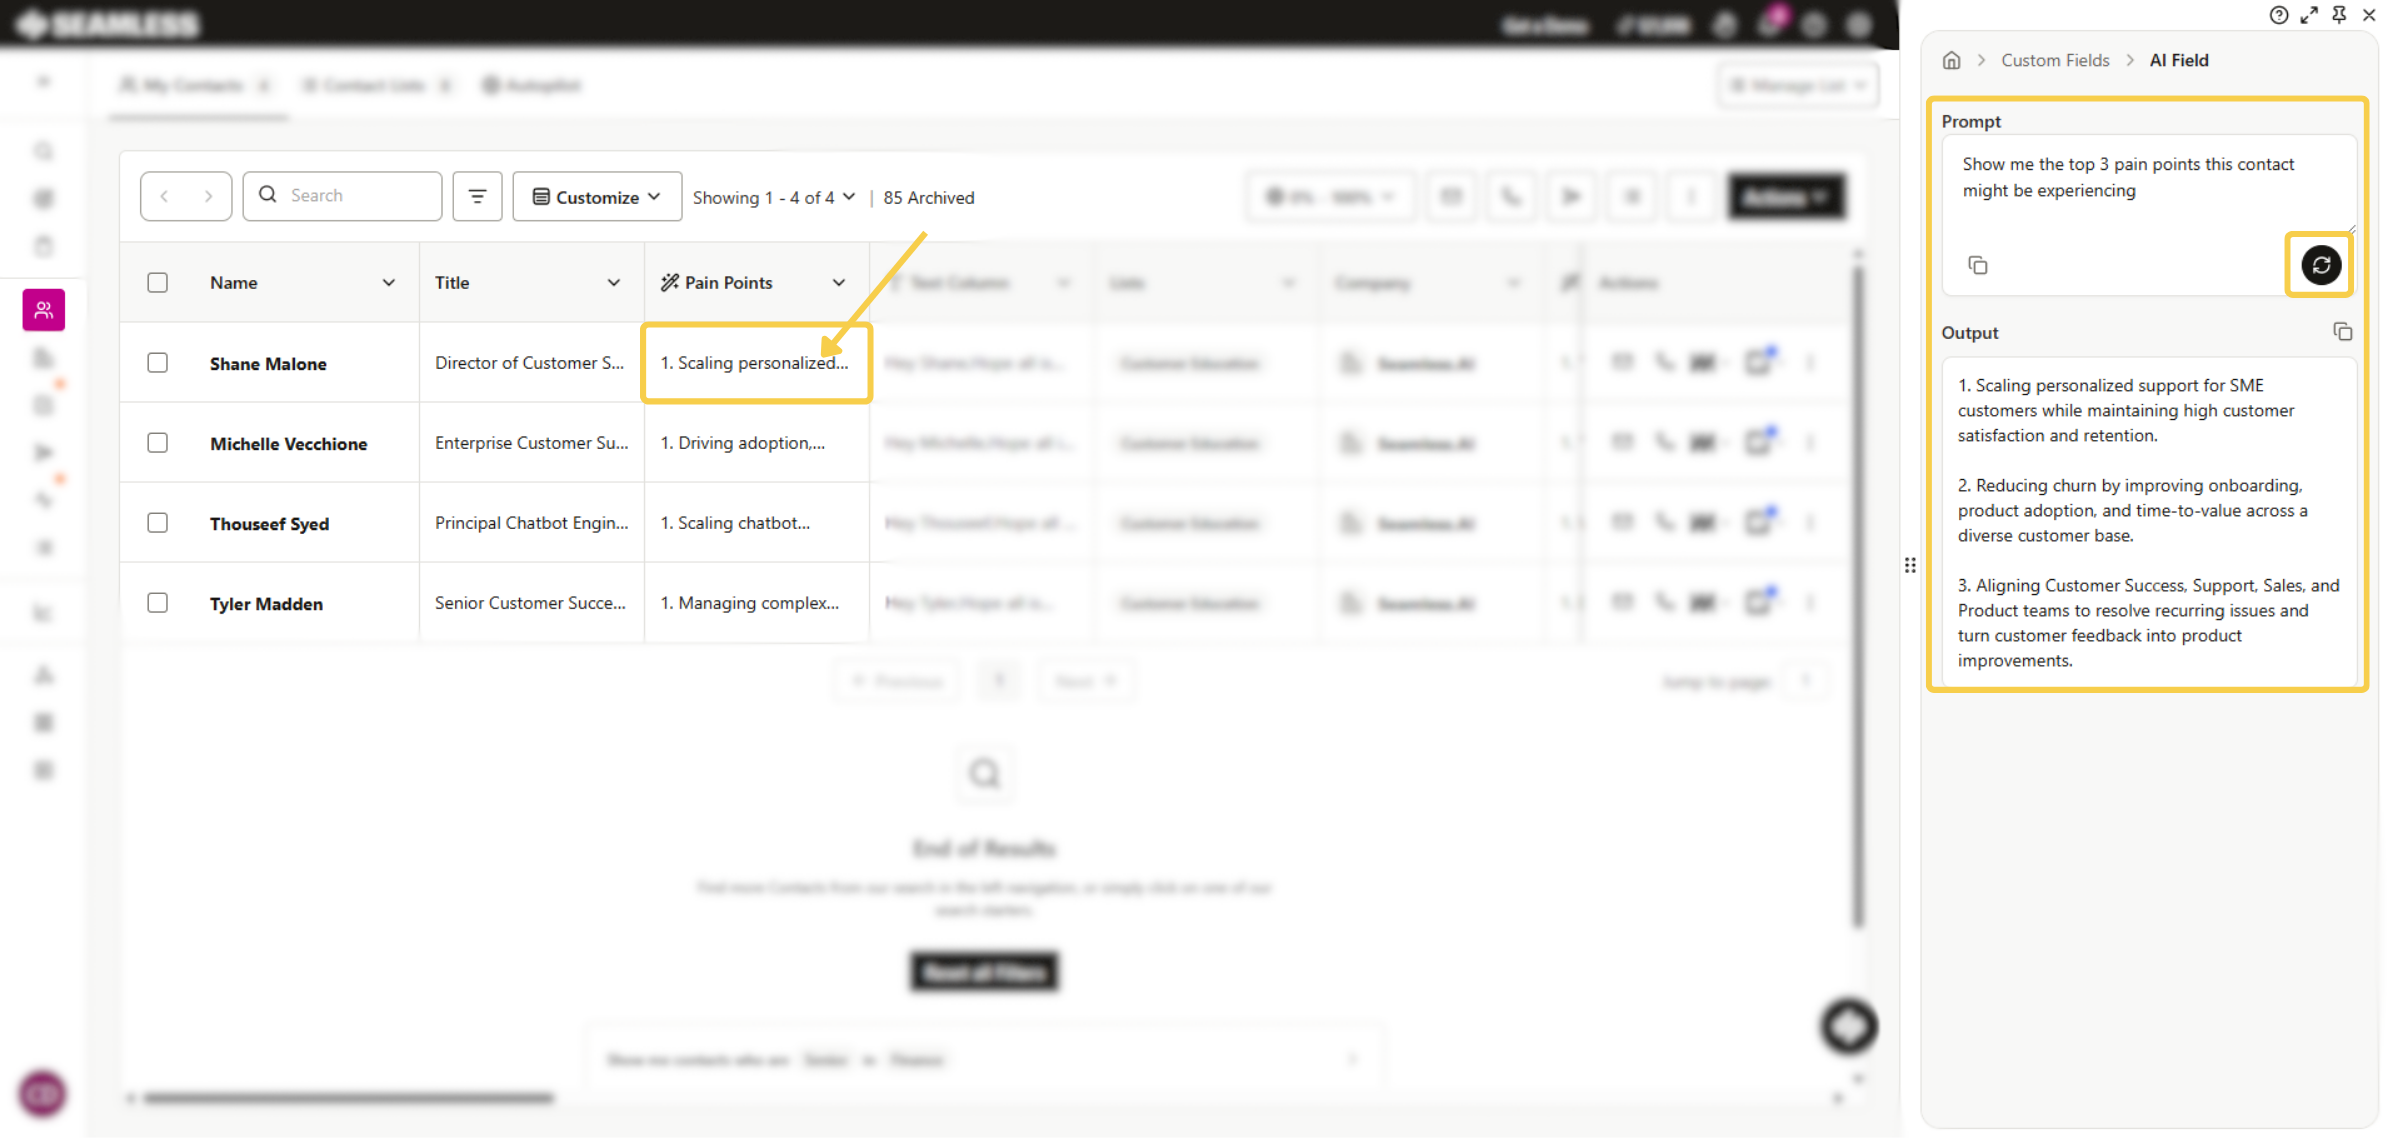
Users can open an individual message for a specific contact and update the prompt just for that contact. After making changes, they can click the refresh icon to generate a new version, then click Save to keep the updated message for that one contact.
Edit the full column
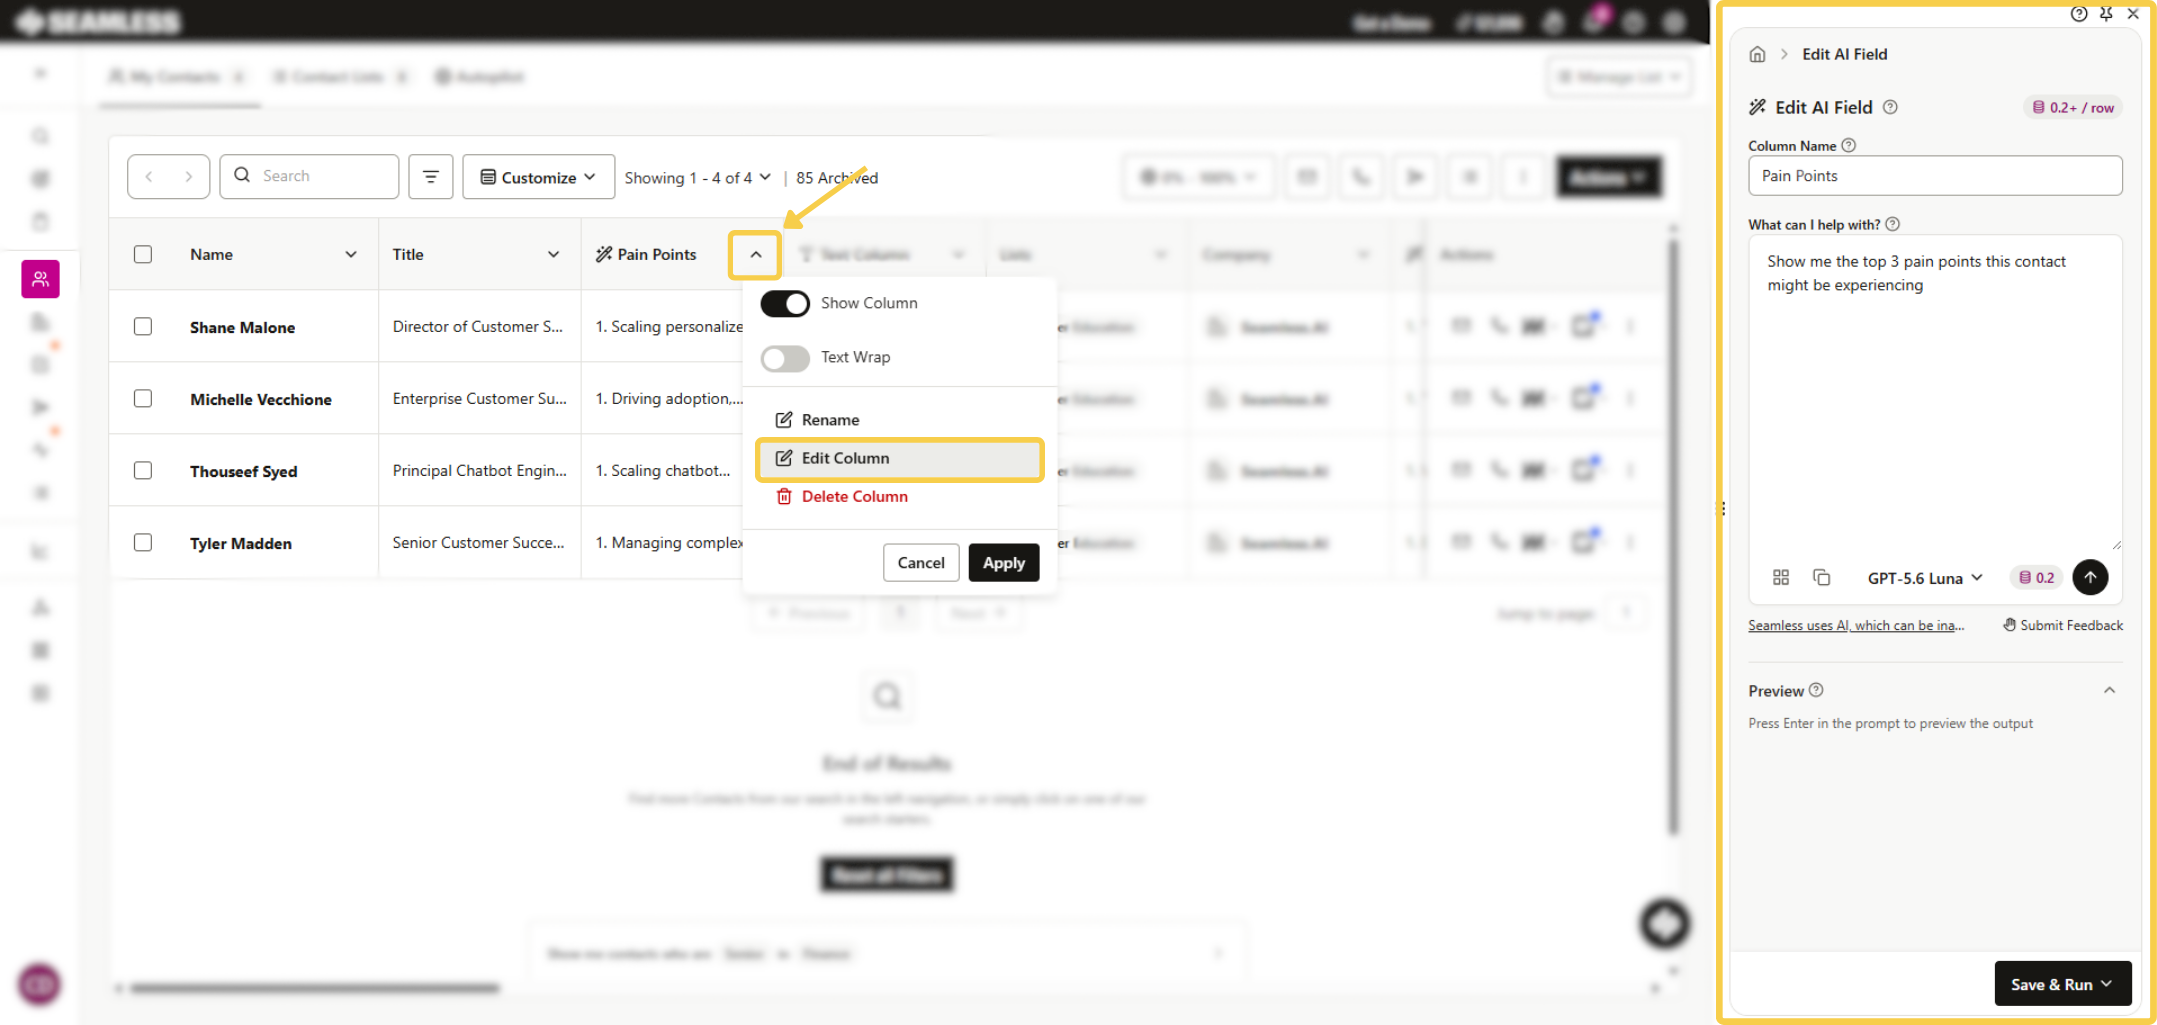
If users want to update the prompt for the entire column, they can click the dropdown menu in the column header and select Edit Column. This opens the original flyout, where they can update the prompt for the full column.
Editing Text Columns
Text Columns can be edited at the column level only.
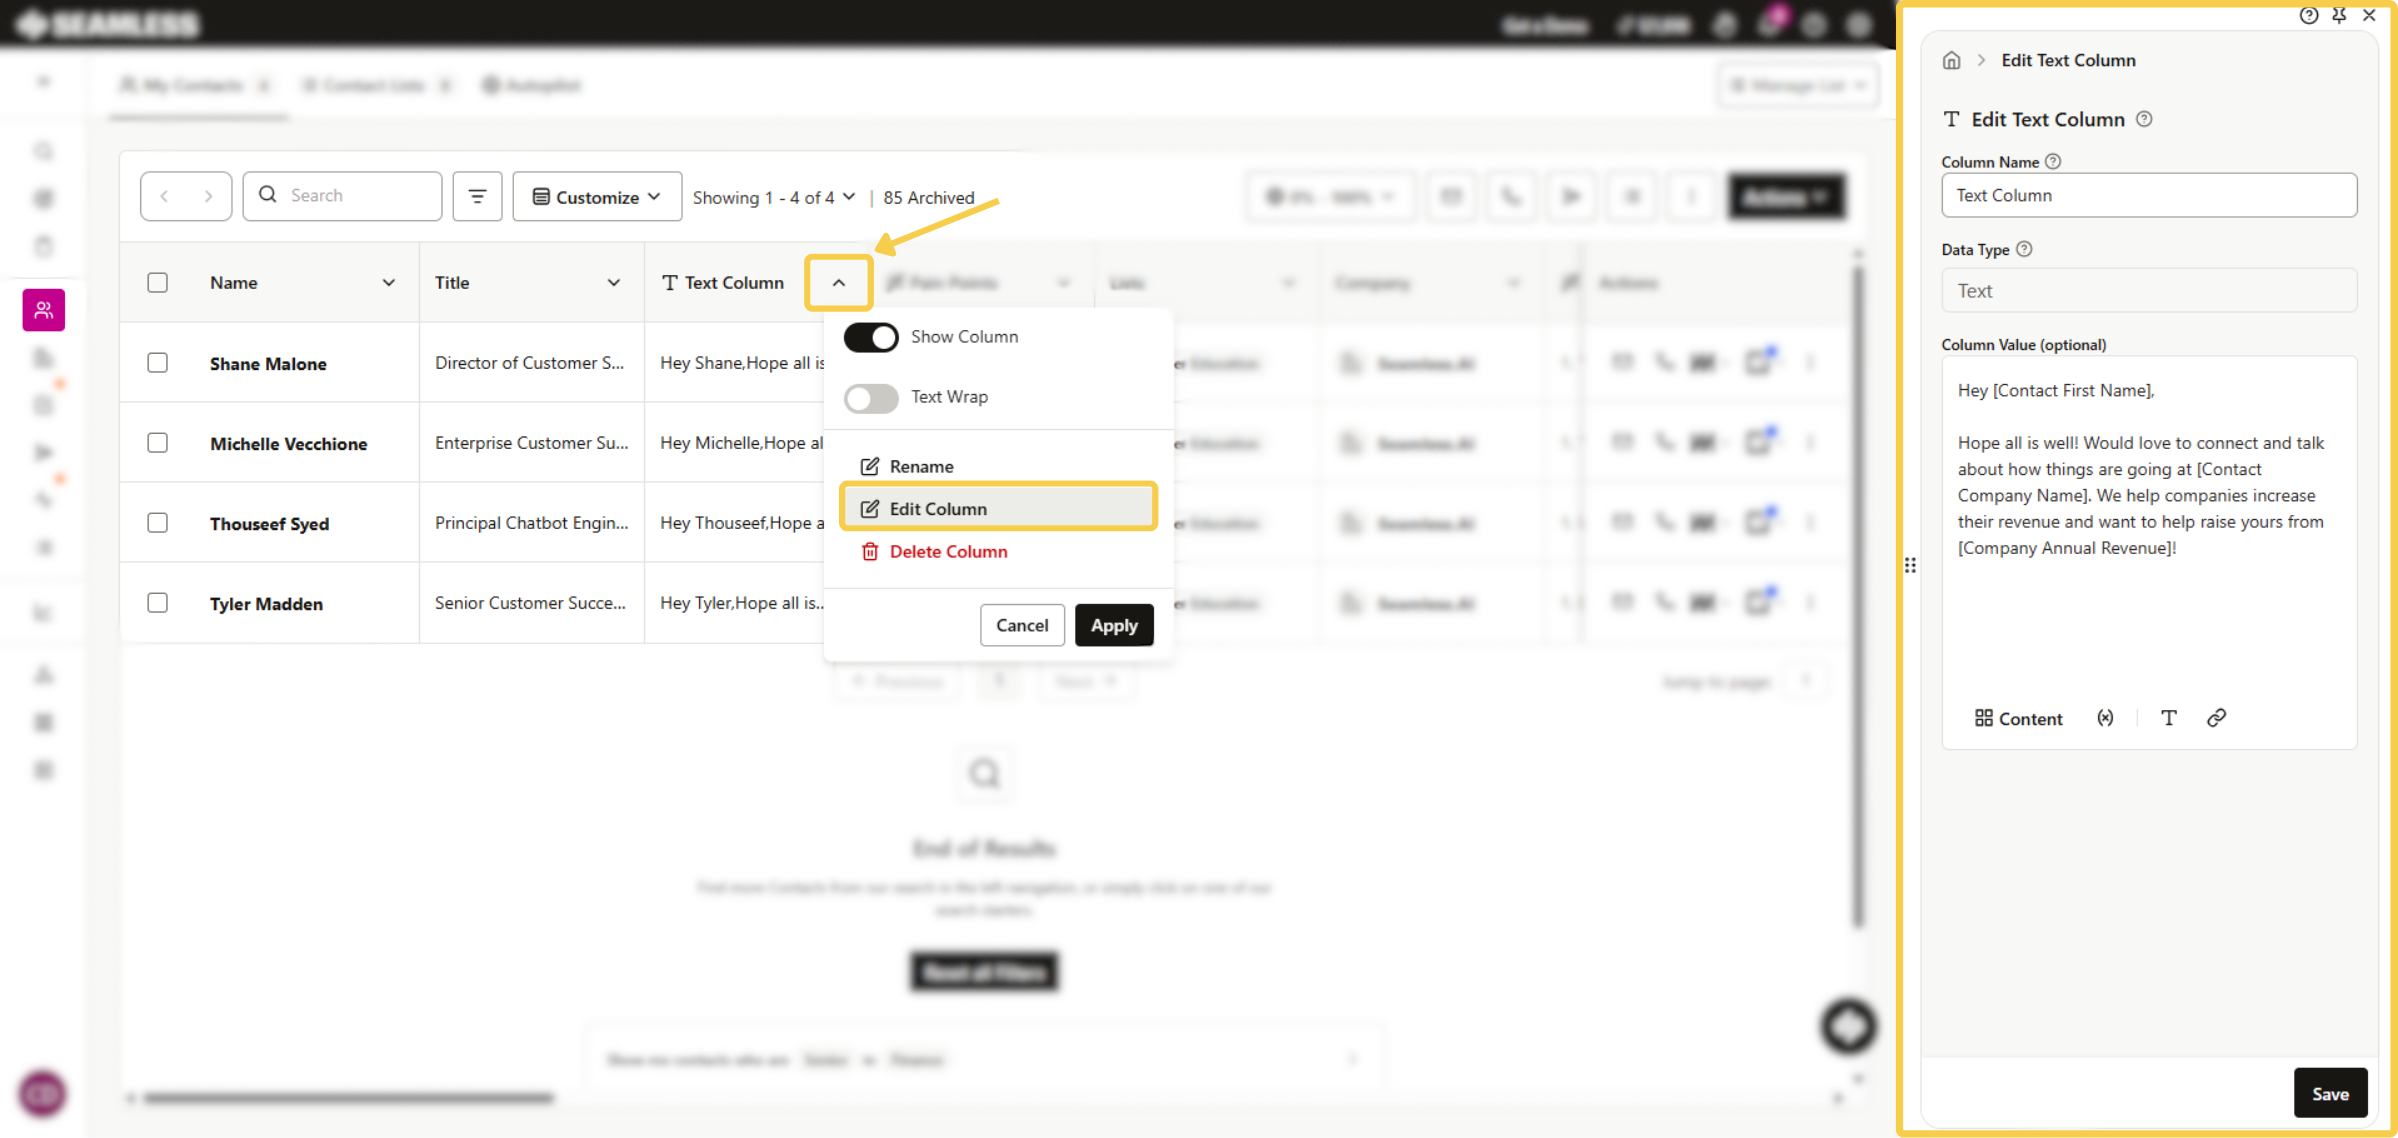
To update a Text Column:
- Click the dropdown menu in the column header
- Select Edit Column
- Update the original text, dynamic variables, links, or formatting
- Save your changes
This will update the column based on the new content entered in the flyout.
Best Practices for AI Fields
To get the most value from AI Fields, it helps to keep a few best practices in mind:
- Use clear column names so it is easy to understand what each column is for
- Choose the correct channel when building AI Columns so the messaging matches the outreach type
- Keep prompts specific enough to guide AI toward the right tone and goal
- Use dynamic variables in Text Columns to make manual messaging feel more personalized
- Use Run on first contact when testing a new prompt before applying it to more contacts
- Update column prompts as your messaging strategy evolves
Example Use Cases
AI Fields can be useful for a wide range of workflows, including:
- Creating personalized cold email drafts
- Building call talking points for reps
- Drafting LinkedIn connection or follow-up messages
- Storing custom notes or outreach messaging by segment
- Testing AI-generated outreach before using it at scale
Summary
AI Fields in My Contacts make it easier to create, manage, and personalize messaging directly alongside your contact data. Users can choose between AI Columns for prompt-based message generation or Text Columns for manually created messaging. Once created, columns can be updated over time so messaging stays flexible and aligned with your workflow.
