Article Feedback

Was this article helpful to your journey? Anything we missed or could expand on? Let us know below.

For specific help with your account or use case, please contact our Customer Support team directly.

Name fields cannot be left blank and cannot use special characters
Please enter a valid business email. Field cannot be left blank.
Field cannot be left blank.
Submit

By submitting this form, you agree to the Seamless.AI Terms of Use & Privacy Policy

Icon of an exclamation mark in a circle
Uh oh, please make sure all fields are complete.
Thank you for your feedback! We've sent it to our team for review.
Icon of an exclamation mark in a circle
Oops! Something went wrong while submitting the form.
General

Single Sign On

Settings & Setup

4

min read

Icon of a bright lightbulb.

Seamless.AI has released enhanced SSO support that is accessible within your Settings pages!

Getting Started

Accessing SAML 2.0 SSO Functionality
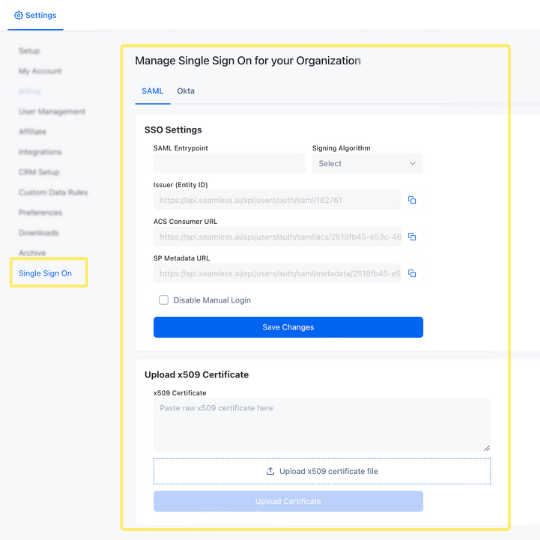
Managing your Single Sign On for your Organization
  1. Login to Seamless.AI with your existing account.
  2. Go to the Settings section within our app by accessing the User icon in the bottom left hand corner followed by Settings > Single Sign on

Required Information

  • Issuer(Entity ID): A unique string that identifies the provider issuing a SAML request.
  • ACS Consumer URL: An endpoint on the service provider where the identity provider will redirect to with its authentication response.
  • SP Metadata URL: An endpoint which contains information necessary for interaction with SAML-enabled identity or service providers.
  • x509 Certificate: x509 is a specific format of certificate that is a requirement in order to setup SAML 2.0 with Seamless

Okta SSO        

Supported Features

Single Sign-On via OpenID Connect: Okta initiated and App initiated        

Requirements

  • Your Seamless.AI organization must be a paid organization with an active subscription.
  • You must be an Admin or the Owner of your Seamless organization.
  • You must be an Admin in your Okta organization.
Setting up Okta SSO

How to set up Okta SSO

  1. Install the Seamless.AI application within your Okta organization.
    • You can do so by searching for Seamless.AI inside the Applications catalog.
  2. Click Add to install Seamless.AI into your Okta organization.
    • Inside General Settings of the Seamless.AI application, add users or groups of users to the Seamless.AI application under the Assignments tab. You must add yourself here to finish the installation process.
    • Go to the Sign On tab in Okta under the installed Seamless.AI application. Keep this open in another tab or window, as you will need it in the next few steps.
  3. Go to Single Sign On tab under Settings in Seamless.AI in a different tab or window.
  4. Click Okta option at the top.
  5. Copy and paste the Client ID and Secret from the Okta Seamless.AI application into the respective fields in the modal that you just opened up. Enter your Okta domain as well in the Okta domain field. Your domain can be found under the General tab of the Seamless.AI Okta application.
    • After all the fields are filled out, click on the Connect Okta button. Your Seamless organization members should be able to connect via Okta now as long as they are in your organization.
    • If for some reason the Seamless.AI member’s email address doesn’t match their Okta email address, you can add their Okta email address in the Edit Member popup on the User management page.
okta and Seamless.AI integration set up

Was this article helpful?

👍
Yes
👎
No
Discover More

Topic Related Articles

Sort
No items found.
No items found.
No items found.
No items found.