Manage Contact & Engagement Statuses
An overview of how Contact and Engagement Statuses function within Seamless’s Connect tool to enhance sales workflow organization. The article outlines how Contact Statuses can be customized to reflect different stages of the sales process, details best practices for naming conventions, transitions, and visual labeling, and explains the role of automated Engagement Statuses in tracking outreach activity.
Note
Managing Contact & Engagement Statuses in Connect
With the Statuses function in Connect, you can optimize how you track and manage contacts across your sales engagement workflows. Contact Statuses help your team identify where each prospect is in the sales process, while Engagement Statuses automatically reflect outreach activity like emails sent or calls logged. Together, these statuses provide visibility, consistency, and structure to your pipeline.
What is a Contact Status?
A Contact Status in Seamless is a simple label that shows exactly where a contact sits in your sales pipeline, whether they’re brand-new, engaged or interested, qualified, paused, disqualified, or closed won/lost.
Think of it as the source of truth for a contact’s current state: reps use it to keep outreach organized, managers use it to monitor pipeline health and reporting, and teams use it to drive filters, views, and automations. Because each contact can have only one status at a time, your whole go-to-market org gets a clear, unambiguous snapshot of each contact’s progress in the sales pipeline.
Accessing the Statuses Page
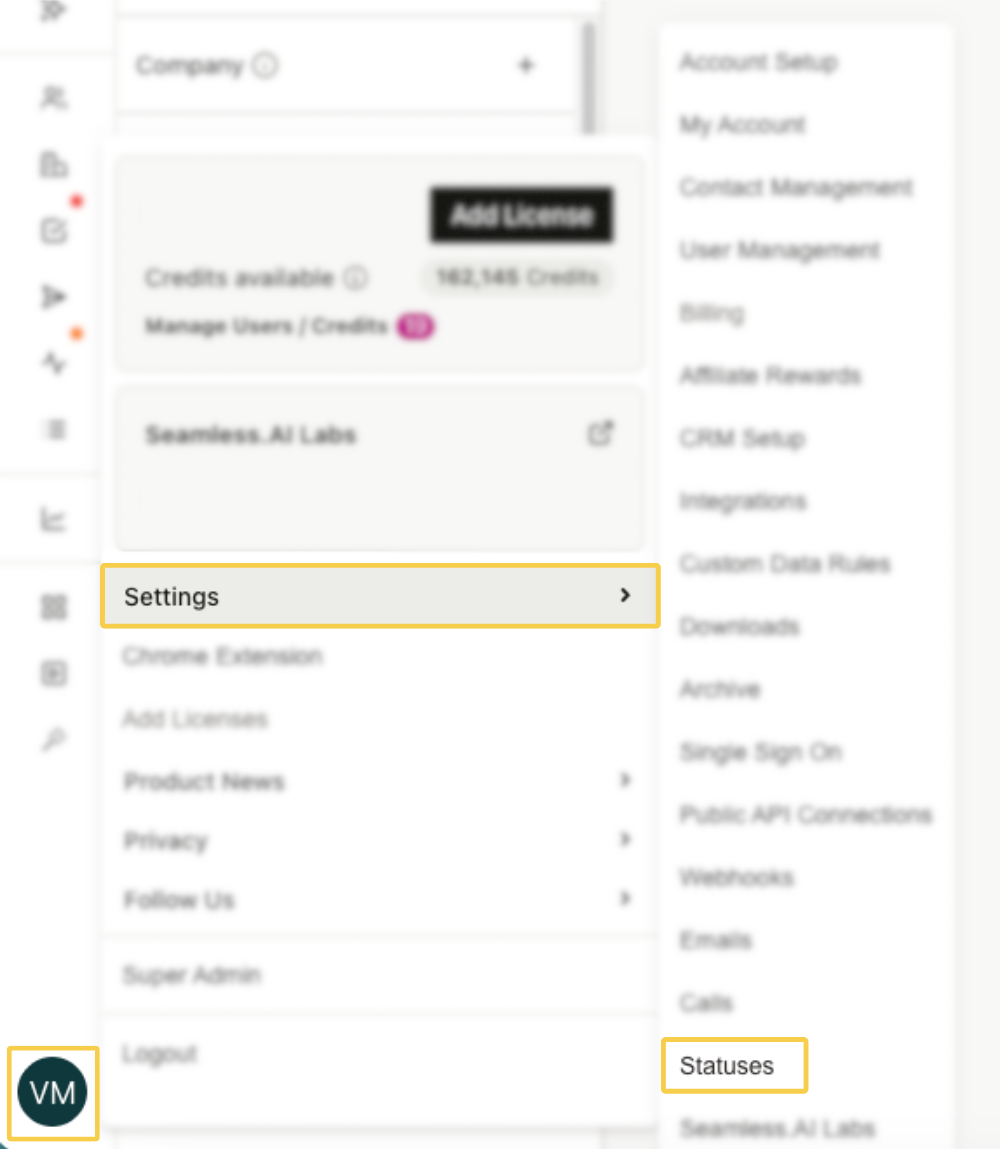
To access your statuses, click on your initials in the bottom-left corner of your Seamless account, then navigate to Settings. Under the Connect Settings section, select Statuses.
You’ll land on the Contact Statuses tab by default, but you’ll also see a second tab for Engagement Statuses at the top.
Managing Contact Statuses
The Contact Statuses tab shows a table of all available contact statuses—both default and user-created. You’ll see the following columns:
- Status: The name and emoji used to label the status.
- Description: A brief explanation of when the status should be applied.
- Active: A toggle to activate or deactivate a status, along with additional options via the three-dot menu.
These statuses help you and your team maintain consistency when tracking lead movement throughout the sales process.
Adding a New Contact Status
To create a new contact status:
- Click the + Add Contact Status button.
- A window will appear allowing you to:
- Choose an emoji that represents the status.
- Give your status a name.
- Add a short description explaining when to use it.
- Click Save, and your new status will appear in the table.
User-created statuses allow you to customize your engagement flow to better reflect statuses that you have internally.
.png)
Managing Status Options
In the Active column, you can use the toggle to activate or deactivate a status. Clicking the three dots next to the toggle provides further management options.
For default statuses provided by Seamless, the only available action is to set a status as your default. The default status is what a contact will be assigned when it is first found with Seamless before any outreach occurs.
For user-created statuses, you have additional options:
- Edit the name or description
- Set as Default
- Delete the status if no longer needed
Updating Contact Statuses While Using Connect
Users can change contact statuses from two different locations within the Connect tool:
The Contact Profile under the Manage section.
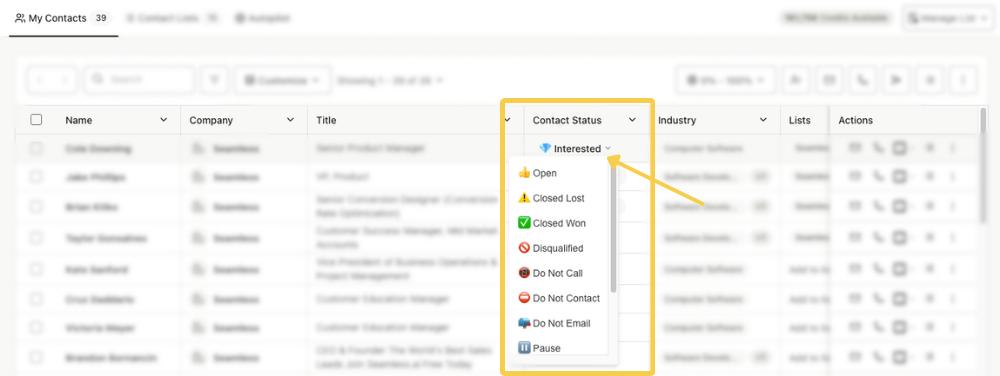
Or, in the Activity Tab, specifically under the Contact Status column.
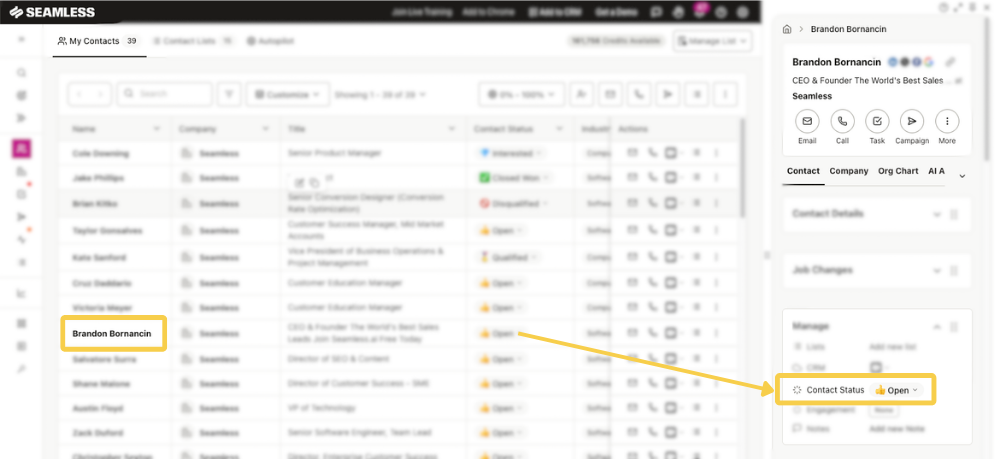
To update a contact’s status, click the dropdown next to the current status. This will reveal a list of all available statuses. Select the desired status, and the change will automatically save and reflect across your Connect workspace.
This feature allows you to quickly update contact progress as you engage, keeping your pipeline current and organized without disrupting your workflow.
Understanding Engagement Statuses
The Engagement Statuses tab provides a reference view of all automated activity-based statuses that a contact may receive in Connect. These cannot be edited or customized, but they help you understand how the system is tracking contact activity.
You’ll see a table with:
- Name: The name of the engagement status.
- Description: An overview of what the status means.
- Trigger: The event that causes the status to be applied.

Best Practices for Contact Statuses
Align Statuses with Sales Stages
- Your statuses should reflect actual movement in the sales cycle - from first touch to closed deal or disqualification
- Use consistent language with CRM Stages (IE: Salesforce, Hubspot, etc.) for easier mapping
Use Clear, Unambiguous Labels
- Choose labels that are easily understood by your Go-To-Market team.
- Avoid vague terms like “Working” or “In Progress” unless specifically defined
Make Statuses Mutually Exclusive
- Each contact should only ever be in one status at a time.
- Avoid overlapping meanings to reduce confusion (IE: don’t use both “Engaged” and “Interested” unless clearly different”
Use Emojis for Quick Visual Scanning
- Emojis like ✅, 📬, 🏅, 🚫 help reps quickly identify pipeline health.
- Maintain consistency in emoji use across the platform.
Define Status Transition Triggers
- Create simple guidelines for when reps should manually update each status. For example:
- Move to 💎 Interested after a positive reply.
Change to 📬 Proposal Sent once a deck or contract is delivered. - Set to ⏸️ Pause if the prospect requests to be contacted at a later date.
- Move to 💎 Interested after a positive reply.
Minimize Subjectivity
- Use objective criteria for statuses like "Qualified" or "Disqualified"
- Define what qualifies as “Interested” (e.g., positive reply, scheduled demo).